LimeSDR ExtIO Plugin for HDSDR
Introduction
LimeSDR is a low cost, open source software defined radio (SDR) platform that can be used to support just about any type of wireless communication standard. This document provides an overview of the installation process and operation of the ExtIO plugin for HDSDR software. Currently this plugin supports LimeSDR-USB and LimeSDR-Mini boards.
Installation
This section covers ExtIO plugin installation instructions. For a simple installation process use precompiled libraries and skip section 2.3. To build plugin from source follow instructions in section 2.3.
Driver installation
First make sure the correct USB drivers are installed. For LimeSDR-USB visit this link and for LimeSDR-Mini visit this link.
ExtIO plugin installation
- Install HDSDR software. Download it by following this link.
- Install Microsoft Visual C++ Redistributable for Visual Studio 2017 x86. Download it by following this link.
- Download the precompiled ExtIO_LimeSDR.dll file to the HDSDR program directory (The default installation directory is: C:\Program Files (x86)\HDSDR).
This concludes the plugin installation process. After launching HDSDR program choose ExtIO_LimeSDR.dll if demanded.
Building from source
Get dependencies
- Visual Studio 2015 or later.
All other dependencies will be installed when building LimeSuite.
Build LimeSuite from source
To build LimeSuite from source you can follow this guide.
Build ExtIO_LimeSDR from source
After building LimeSuite from source open the GIT Bash command prompt and run the following command to clone the repository:
git clone https://github.com/myriadrf/ExtIO_LimeSDR
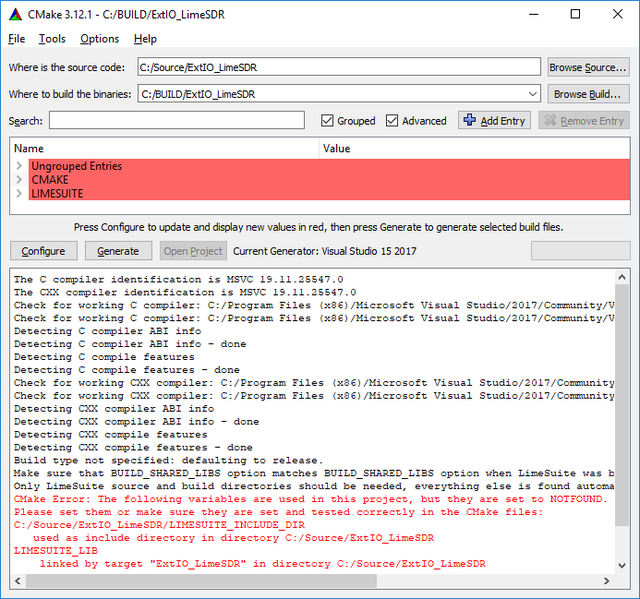
Use cmake-gui to configure and generate the visual studio project solution. After choosing the source and build directory click configure button. CMakeSetup dialog should pop up, make sure to choose 32bit generator otherwise the plugin won’t work. After selecting generator an error that LimeSuite includes and libraries are not found should be seen, don’t mind it now as it will be fixed in the next step. CMake window after clicking configure button is shown in Figure 1.
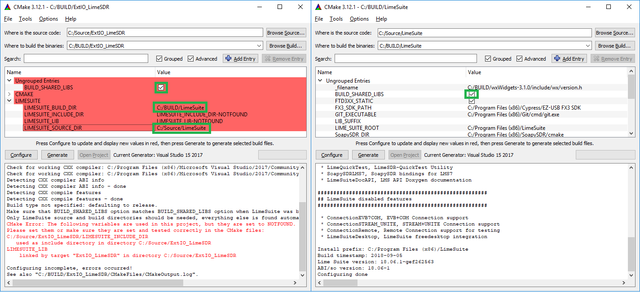
Next expand LIMESUITE and Ungrouped Entries options. Make sure that BUILD_SHARED_LIBS option matches BUILD_SHARED_LIBS option when LimeSuite was built. Choose LIMESUITE_BUILD_DIR path which should be a folder where LimeSuite was built and LIMESUITE_SOURCE_DIR which should be a path to LimeSuite source directory. LimeSuite and ExtIO_LimeSDR CMake settings example is shown in Figure 2.
Then click Generate button which will create the Visual Studio project solution. Next click Open Project button which will open Visual Studio program with the generated project. If CMake doesn’t have Open Project button open ExtIO_LimeSDR.sln file located in BUILD/ExtIO_LimeSDR/ directory. Change solution configuration from Debug to Release (as shown in Figure 3) and run the build target.

Now copy the ExtIO_LimeSDR.dll file which is located in BUILD/ExtIO_LimeSDR/Release directory to HDSDR installation directory. If BUILD_SHARED_LIBS option was checked LimeSuite.dll will also be needed, copy it to the HDSDR installation directory from BUILD/LimeSuite/bin/Release folder. This concludes the installation process. After launching HDSDR program choose ExtIO_LimeSDR.dll if demanded.
Device configuration
Device configuration in ExtIO dialog
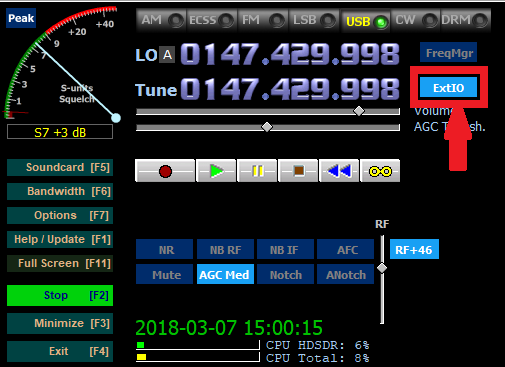
To open the configuration window, click the ExtIO button in the HDSDR program as shown in Figure 4.
After clicking the button, a dialog box shown in Figure 5 should appear.

Available dialog panel options:
- Device: This dropdown menu shows all connected LimeSDR devices. After switching to a different device all settings are reset to their defaults.
- Channel: This dropdown menu is used to change the active RX channel. The number of available channels depends on the connected device. After switching to a different channel, all other settings are kept unchanged.
- Antenna: This dropdown menu is used to select the antenna for the specified RX channel. Number of available antennas depends on selected device.
- Calibrate: This button performs an automatic IQ gain and phase correction of the specified RX channel. The calibration bandwidth is set in the textbox and the available range for bandwidth is from 2.5MHz to 120MHz. Calibration is performed automatically after changing the device, switching the channel, changing the antenna, pressing the reset button, changing the sampling rate, enabling or disabling the LPF or changing LPF bandwidth. Calibration bandwidth is automatically changed after switching sample rate or after setting the LPF bandwidth lower than calibration bandwidth. Calibration can and should be performed manually after changing the LO frequency or any gain control.
- Calibration Status: This text indicates the current status of calibration. Currently it can have three states:
- Calibrated – This shows that the device is calibrated and ready to use.
- Not Calibrated – This shows that the device is not calibrated.
- Calibration Failed – This shows that the calibration was performed unsuccessfully.
- Set: This button changes the LPF bandwidth to the one set in the textbox and enables the filter if it was disabled. The available range for bandwidth selection is from 1.4MHz to 130MHz. The LPF bandwidth is automatically changed after switching sample rate. For more information about the LPF follow this link.
- Enable LPF: This checkbox controls if the LPF is enabled or disabled.
- Reset: This button reinitializes the LimeSDR board with default settings. Default settings are listed in Table 1.
| Setting | Default value |
|---|---|
| Channel | RX1 |
| Antenna | LNA_H |
| Calibration bandwidth | 4.0 MHz |
| Analog LPF bandwidth | 4.0 MHz |
| LNA | -5dB |
| TIA | 0dB |
| PGA | -4dB |
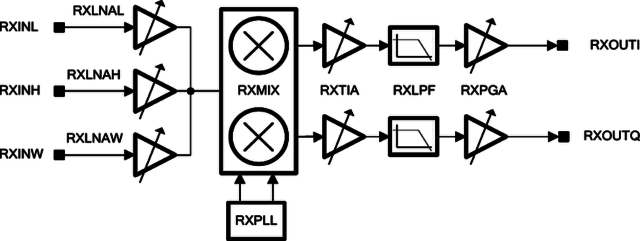
- Gain settings: This block has three sliders which control the three separate gain control elements. The gain control architecture is shown in Figure 6.
- LNA: This gain control consists of 30 dB range with 1 dB steps at high gain settings and 3 dB steps at low gain settings.
- TIA: This gain control slider has 12 dB range but only three steps which are 0 dB, -3 dB and -12 dB.
- PGA: This gain control slider has 32 dB range with 1 dB steps.
Device configuration in the HDSDR software
To change the device gain with one slider, press the RF button and move the slider in the HDSDR software window as shown in Figure 7.
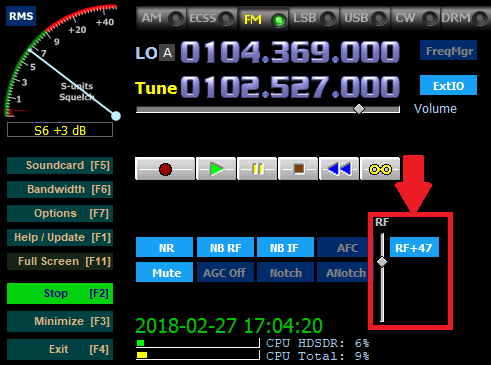
This gain control consists of 74 dB range with 1 dB steps.
To change the sampling rate, press the Bandwidth [F6] button in the HDSDR software window. A new menu will appear where you can change the sample rate.
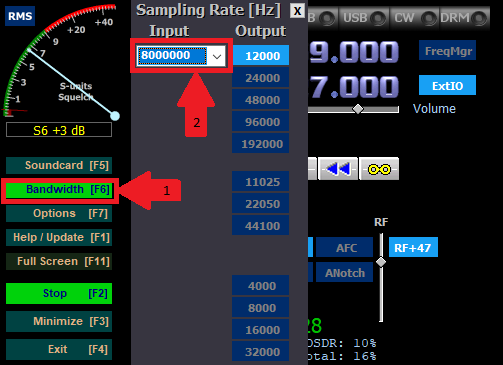
Available sampling rates are 2, 4, 8, 10, 15, 20, 25 and 30MSPS. Changing the sampling rate also changes current LPF and Calibration bandwidth.
More information
| |||||||||||||||||||||