ClockTamerLinuxBuildHowto
Environment setup
Our main development platform is Ubuntu and to date it's the only tested build environment. We welcome any additions and corrections to this howto, especially build instructions for other platforms.
Install tools required for building firmware:
sudo aptitude install gcc-avr avr-libc unzip
Instructions for installing software for flashing are included in the respective sections about flashing, since they depend on the tools you use.
Source code preparation
To check out the source code and prepare it for building, execute the following commands.
Check out clock-tamer project:
git clone https://github.com/myriadrf/clock-tamer.git
cd clock-tamer/board
Download LUFA 091122, unpack to clock-tamer/LUFA directory and patch it:
wget http://www.fourwalledcubicle.com/files/MyUSB/LUFA%20091122.zip
unzip "LUFA 091122.zip"
ln -s "LUFA 091122" LUFA-CUR
patch -p0 <patches/lufa.diff
User code image (for USB flashing)
This image only has usercode without USB bootloader. It can be flash with usual mini-USB cable without any expensive ISP programmer needed.
Building
Depending upon the ClockTamer modification, you have to use one of the following defines:
Define                            HWI
------                            ---
TAMER_1515_20                     LMX=1515 LMK=1010 OSC=20
TAMER_2080_20                     LMX=2080 LMK=1010 OSC=20
TAMER_2080_10                     LMX=2080 LMK=1010 OSC=10
TAMER_2080_VCTXCO_26_GPS          LMX=2080 LMK=1010 OSC=26 VCTXCO GPS
TAMER_1650_26_GPS                 LMX=1650 LMK=1010 OSC=26 GPS
You can lookup your hardware info by executing the HWI command.
To build a flash image define the variable and run make in the clock-tamer/board directory. For the "LMX=2080 LMK=1010 OSC=20" device it is:
CFLAGS="-DTAMER_2080_20" make
If everything went fine, you should get a lot of output, ending with this:
Size after:
AVR Memory Usage
----------------
Device: at90usb162

Program:    6808 bytes (41.6% Full)
(.text + .data + .bootloader)

Data:        152 bytes (29.7% Full)
(.data + .bss + .noinit)

EEPROM:      411 bytes (80.3% Full)
(.eeprom)


-------- end --------
Flashing
On completion of a successful build in the clock-tamer directory you will find generated Tamer-sdk-v1.hex and Tamer-sdk-v1.eep files, which are ready to be flashed onto your ClockTamer. You can also use Tamer-sdk-v1.elf if your programmer supports this.
Actual flashing instructions depend on the particular type of flasher application you have. We use dfu-programmer, which is readily available in Ubuntu. If you use Ubuntu 9.10 or later, just install it from the repository:
sudo aptitude install dfu-programmer
And if you use Ubuntu 9.04 or your `dfu-programmer` version is <0.5 we advise you to install it from [source.
When you have dfu-programmer ready, follow these steps:
- Power off ClockTamer: disconnect power cord AND mini-USB cable.
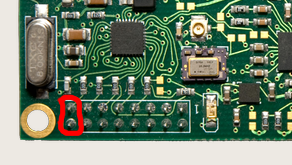
- Short-circuit nSS pin of GND (full connector pinout is available.

- Connect ClockTamer to a computer with a mini-USB cable. LED should light up immediately (WITHOUT flashing once first).
- Remove short-circuit from nSS to GND.
- In the board directory run
make dfu
If you want to flash EEPROM data too, run
make dfu-ee
Full image (for ISP flashing)
This image contains the complete code — including USB bootloader — and is suitable for ISP flashing.
Note that to be able to flash ClockTamer over USB after you flash the full image, you need to generate your own SDK header. Differences in compiler versions will likely cause different placement of bootloader functions and make standard SDK header useless.
Building
The building procedure is similar to those of the standard image, but you should set environment variable SDK=0, e.g.
SDK=0 CFLAGS="-DTAMER_2080_20" make
If everything went fine, you should get an output similar to this:
Size after:
AVR Memory Usage
----------------
Device: at90usb162

Program:   10618 bytes (64.8% Full)
(.text + .data + .bootloader)

Data:        152 bytes (29.7% Full)
(.data + .bss + .noinit)

EEPROM:      437 bytes (85.4% Full)
(.eeprom)


-------- end --------
Flashing
After a successful build in the clock-tamer directory you will find generated Tamer.hex and Tamer.eep files which are ready to be flashed onto your ClockTamer. You can also use Tamer.elf if your programmer supports this format.
Actual flashing instructions depend on the type of flasher and application that you have. To flash a full image we mostly use AVR Dragon]. If you an AVR Dragon follow these steps:
- Download avrdude from and build it. Pre-built avrdude 5.2 crashes when you try to use it with AVR Dragon, because of this bug. The bug is fixed in rev887 and rev895 in avrdude svn, so make sure you use one of the more recent revisions.
- Connect ClockTamer to AVR Dragon, according to SPI pinout.
- In the board directory run
SDK=0 make program
If you connected everything correctly, you should have now have a new image uploaded to your ClockTamer.
Note that this operation erases EEPROM and thus you lose your calibration. You may want to write down your calibrated values somewhere or disable EEPROM write by commenting out this line in makefile:
AVRDUDE_WRITE_EEPROM = -U eeprom:w:$(TARGET).eep
| |||||||||||||||||||||