LimeSDR-USB Quick Test: Difference between revisions
AndrewBack (talk | contribs) (Created page with "== Introduction == The Lime Suite GUI is a powerful tool for configuring and debugging hardware platforms that are based around the LMS7002M transceiver chip. It allows you t...") |
AndrewBack (talk | contribs) No edit summary |
||
| Line 3: | Line 3: | ||
The Lime Suite GUI is a powerful tool for configuring and debugging hardware platforms that are based around the LMS7002M transceiver chip. It allows you to view, edit, save and load the state of LMS7002M registers, perform board microcontroller firmware and FPGA gateware updates, and view FFT plots and configure various other on-board modules. | The Lime Suite GUI is a powerful tool for configuring and debugging hardware platforms that are based around the LMS7002M transceiver chip. It allows you to view, edit, save and load the state of LMS7002M registers, perform board microcontroller firmware and FPGA gateware updates, and view FFT plots and configure various other on-board modules. | ||
This guide shows how | This guide shows how Lime Suite GUI can be used to configure the LMS7002M on a LimeSDR-USB, before displaying a received signal via the FFTviewer module, and then transmitting a test signal which can be observed on a spectrum analyser. Thereby confirming operation of the board — with appropriate firmware and gateware loaded — O/S drivers and Lime Suite. | ||
''Please note that this does not confirm the availability and correct operation of APIs exposed by components sitting above Lime Suite in the software stack, such as SoapySDR, UHD and gr-osmosdr etc. These must be tested separately''. | |||
== Receiving a signal == | == Receiving a signal == | ||
| Line 12: | Line 14: | ||
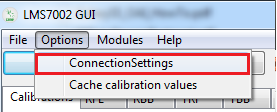
2. From menu bar select: ‘Options->ConnectionSettings’ | 2. From menu bar select: ‘Options->ConnectionSettings’ | ||
[[File:LimeSDR-USB_Quick_Test_Fig1.png]] | |||
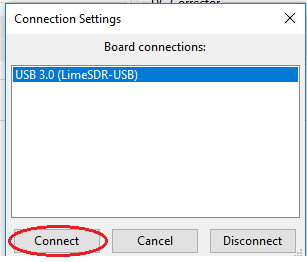
3. Select the device and click the “Connect” button | 3. Select the device and click the “Connect” button | ||
[[File:LimeSDR-USB Quick Test Fig2.png]] | |||
=== Load the configuration file === | === Load the configuration file === | ||
| Line 19: | Line 24: | ||
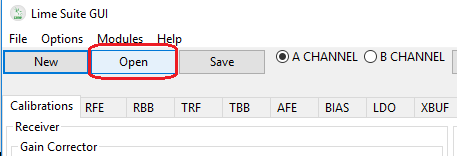
1. In LimeSuite GUI click the ‘Open’ button | 1. In LimeSuite GUI click the ‘Open’ button | ||
[[File:LimeSDR-USB Quick Test Fig3.png]] | |||
2. Navigate and select example INI file ‘example.ini’ | 2. Navigate and select example INI file ‘example.ini’ | ||
| Line 31: | Line 37: | ||
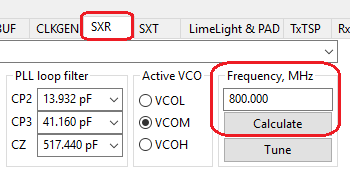
3. Press the ‘Calculate’ button. | 3. Press the ‘Calculate’ button. | ||
[[File:LimeSDR-USB_Quick_Test_Fig4.png]] | |||
NOTE: The minimum allowed frequency is 30 MHz. | NOTE: The minimum allowed frequency is 30 MHz. | ||
=== Change the sampling rate === | === Change the sampling rate === | ||
The sampling rate set in the ‘example.ini’ configuration file is 10 MHz. | The sampling rate set in the ‘example.ini’ configuration file is 10 MHz. | ||
| Line 45: | Line 51: | ||
3. Click the “Calculate” button. | 3. Click the “Calculate” button. | ||
[[File:LimeSDR-USB Quick Test Fig5.png ]] | |||
=== Viewing the signal using FFT viewer === | === Viewing the signal using FFT viewer === | ||
| Line 52: | Line 59: | ||
1. From the menu bar select: ‘Modules->FFTviewer’ | 1. From the menu bar select: ‘Modules->FFTviewer’ | ||
[[File:LimeSDR-USB_Quick_Test_Fig6.png]] | |||
2. Click “Start” button to start receiving samples | 2. Click “Start” button to start receiving samples | ||
[[File:LimeSDR-USB Quick Test Fig7.png]] | |||
=== Receiving test signal === | === Receiving test signal === | ||
| Line 60: | Line 69: | ||
To enable test signal RX go to “RxTSP” tab and set input source to “Test signal”. | To enable test signal RX go to “RxTSP” tab and set input source to “Test signal”. | ||
[[File:LimeSDR-USB Quick Test Fig8.png]] | |||
You can try playing around with test signal by changing TSGFCW, TSGMODE, TSGFC, CMIX values. | You can try playing around with test signal by changing TSGFCW, TSGMODE, TSGFC, CMIX values. | ||
=== Changing RX gain === | === Changing RX gain === | ||
Rx gains can be adjusted in the “RFE” tab by changing ‘LNA’ and the ‘TIA’ values (Figure 9), and in the “RBB” tab by changing ‘PGA gain’ value. | Rx gains can be adjusted in the “RFE” tab by changing ‘LNA’ and the ‘TIA’ values (Figure 9), and in the “RBB” tab by changing ‘PGA gain’ value. | ||
[[File:LimeSDR-USB Quick Test Fig9.png]] | |||
[[File:LimeSDR-USB_Quick_Test_Fig10.png]] | |||
== Transmitting a signal == | == Transmitting a signal == | ||
| Line 75: | Line 88: | ||
2. From the menu bar select: ‘Options→ConnectionSettings’ | 2. From the menu bar select: ‘Options→ConnectionSettings’ | ||
3. Select the device to connect to and click the “Connect” button. | 3. Select the device to connect to and click the “Connect” button. | ||
=== Load the configuration file === | === Load the configuration file === | ||
| Line 91: | Line 103: | ||
3. Press the ‘Calculate’ button. | 3. Press the ‘Calculate’ button. | ||
[[File:LimeSDR-USB Quick Test Fig11.png]] | |||
4. A spectrum analyser can be used to view the TX carrier signal | 4. A spectrum analyser can be used to view the TX carrier signal | ||
[[File:LimeSDR-USB_Quick_Test_Fig12.png]] | |||
=== Transmitting test signal === | === Transmitting test signal === | ||
| Line 99: | Line 113: | ||
To enable TX test signal go to the “TxTSP” tab and set the input source to “Test signal”. | To enable TX test signal go to the “TxTSP” tab and set the input source to “Test signal”. | ||
[[File:LimeSDR-USB_Quick_Test_Fig13.png]] | |||
A spectrum analyzer can be used to view the TX test signal. | |||
[[File:LimeSDR-USB_Quick_Test_Fig14.png]] | |||
=== Changing TX gain === | === Changing TX gain === | ||
Tx gain can be adjusted in the “TBB” tab by changing the ‘Frontend gain’ value. | Tx gain can be adjusted in the “TBB” tab by changing the ‘Frontend gain’ value. | ||
[[File:LimeSDR-USB Quick Test Fig15.png]] | |||
==Document Version == | |||
Based on LimeSDR-USB Quick Test v1.1 document. | |||
{{Community}} | {{Community}} | ||
Revision as of 13:21, 24 January 2017
Introduction
The Lime Suite GUI is a powerful tool for configuring and debugging hardware platforms that are based around the LMS7002M transceiver chip. It allows you to view, edit, save and load the state of LMS7002M registers, perform board microcontroller firmware and FPGA gateware updates, and view FFT plots and configure various other on-board modules.
This guide shows how Lime Suite GUI can be used to configure the LMS7002M on a LimeSDR-USB, before displaying a received signal via the FFTviewer module, and then transmitting a test signal which can be observed on a spectrum analyser. Thereby confirming operation of the board — with appropriate firmware and gateware loaded — O/S drivers and Lime Suite.
Please note that this does not confirm the availability and correct operation of APIs exposed by components sitting above Lime Suite in the software stack, such as SoapySDR, UHD and gr-osmosdr etc. These must be tested separately.
Receiving a signal
Connect to board
1. Launch Lime Suite GUI (LimeSuiteGUI.exe on Windows or just ‘LimeSuiteGUI’ on Linux) 2. From menu bar select: ‘Options->ConnectionSettings’
3. Select the device and click the “Connect” button
Load the configuration file
1. In LimeSuite GUI click the ‘Open’ button
2. Navigate and select example INI file ‘example.ini’ 3. Lime Suite GUI should be updated with values loaded from INI file.
Change the carrier frequency
In ‘example.ini’ the receiver frequency is set to 800 MHz. To change the receiver frequency:
1. Go to the “SXR” tab in Lime Suite GUI 2. Enter desired RX frequency in the field labelled “Frequency, MHz”. 3. Press the ‘Calculate’ button.
NOTE: The minimum allowed frequency is 30 MHz.
Change the sampling rate
The sampling rate set in the ‘example.ini’ configuration file is 10 MHz.
The simplest way to change the sampling rate without changing any dividers:
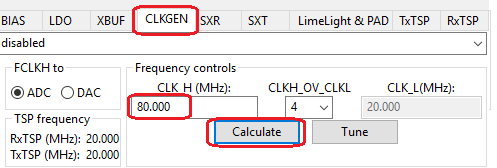
1. Go to the “CLKGEN” tab. 2. Adjust the “CLK_H (MHz)” value so that it is 8 times the desired sample rate. E.g. 80 MHz CLK_H will result in 10 MHz sample rate (10 MHz RF bandwidth). 3. Click the “Calculate” button.
Viewing the signal using FFT viewer
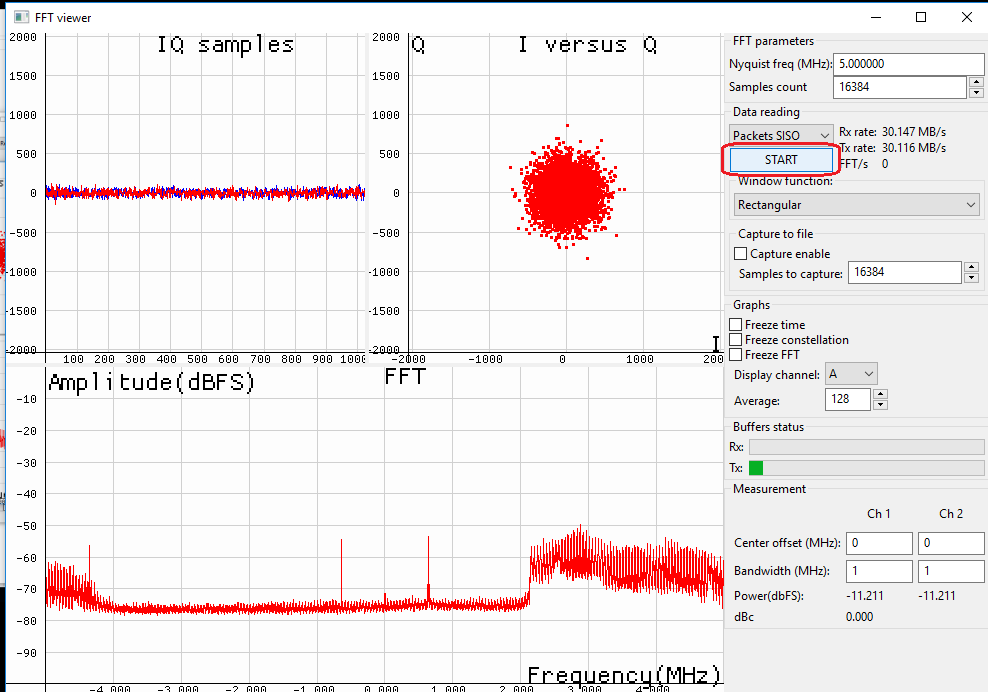
Once the receiver frequency and sampling rate is configured, the RF signal can be observed using FFT viewer. In the ‘example.ini’ file the receiver is configured to use ‘RX1_L’ input and so the antenna should be connected to this port.
1. From the menu bar select: ‘Modules->FFTviewer’
2. Click “Start” button to start receiving samples
Receiving test signal
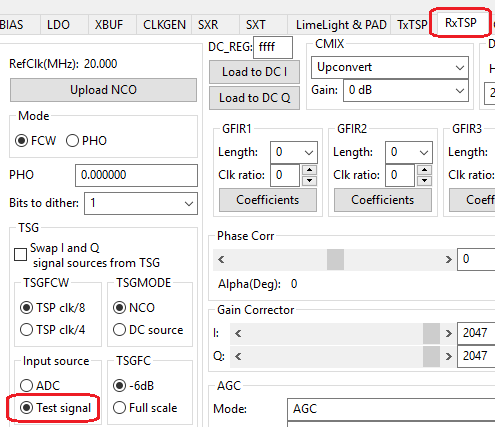
To enable test signal RX go to “RxTSP” tab and set input source to “Test signal”.
You can try playing around with test signal by changing TSGFCW, TSGMODE, TSGFC, CMIX values.
Changing RX gain
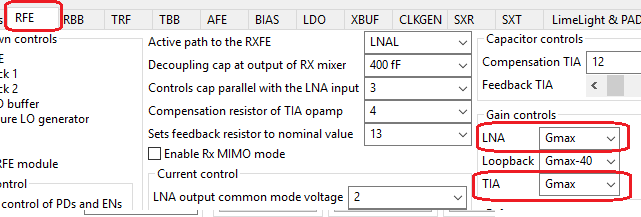
Rx gains can be adjusted in the “RFE” tab by changing ‘LNA’ and the ‘TIA’ values (Figure 9), and in the “RBB” tab by changing ‘PGA gain’ value.
Transmitting a signal
Connect to the board
1. Launch the Lime Suite GUI as before. 2. From the menu bar select: ‘Options→ConnectionSettings’ 3. Select the device to connect to and click the “Connect” button.
Load the configuration file
1. In Lime Suite GUI click the ‘Open’ button. 2. Navigate and select the example INI file ‘example.ini’ 3. Lime Suite GUI should be updated with values loaded from the INI file.
Change the carrier frequency
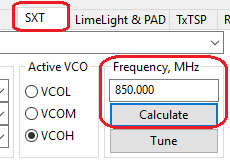
In ‘example.ini’ the transmitter frequency is set to 850 MHz. To change the transmitter frequency:
1. Go to the “SXT” tab in Lime Suite GUI 2. Enter the desired TX frequency in the field labelled “Frequency, MHz”. Note that the minimum allowed frequency is 30 MHz. 3. Press the ‘Calculate’ button.
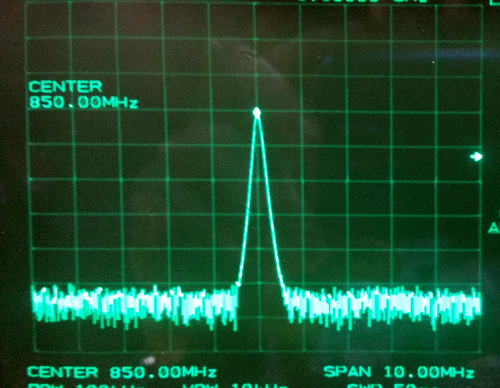
4. A spectrum analyser can be used to view the TX carrier signal
Transmitting test signal
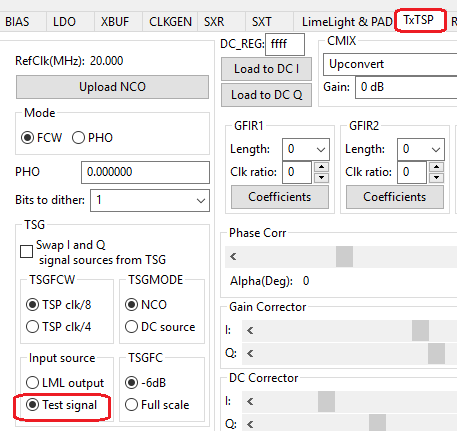
To enable TX test signal go to the “TxTSP” tab and set the input source to “Test signal”.
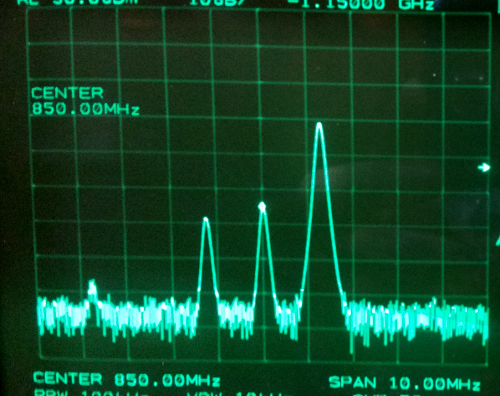
A spectrum analyzer can be used to view the TX test signal.
Changing TX gain
Tx gain can be adjusted in the “TBB” tab by changing the ‘Frontend gain’ value.
Document Version
Based on LimeSDR-USB Quick Test v1.1 document.
| |||||||||||||||||||||
