LimeMicro:LMS6002D Programming and Calibration: Difference between revisions
Ghalfacree (talk | contribs) (Added version tracking section.) |
Ghalfacree (talk | contribs) m (Updated diagram.) |
||
| Line 1,956: | Line 1,956: | ||
Changes since document generation: | Changes since document generation: | ||
* Updated [[#General DC Calibration Procedure|General DC Calibration Procedure]] diagram. | |||
* Minor formatting changes and corrections. | * Minor formatting changes and corrections. | ||
{{LimeMicro}} | {{LimeMicro}} | ||
Revision as of 14:41, 13 October 2015
Serial Port Interface
Description
The functionality of the LMS6002 transceiver is fully controlled by a set of internal registers which can be accessed through a serial port interface. Both write and read operations are supported. The serial port can be configured to run in 3 or 4 wire mode with the following pins used:
- SEN - serial port enable, active low
- SCLK - serial clock
- SDIO - serial data in/out in 3 wire mode, serial data input in 4 wire mode
- SDO-serial data out in 4 wire mode, don’t care in 3 wire mode
Serial port key features:
- 16 serial clock cycles are required to complete write operation
- 16 serial clock cycles are required to complete read operation
- Multiple write/read operations are possible without toggling serial enable signal
All configuration registers are 8-bit wide. Write/read sequence consists of 8-bit instruction followed by 8-bit data to write or read. The MSB of the instruction bit stream is used as SPI command, where CMD = 1 for write and CMD = 0 for read. Next 3 bits represent the block address, since LMS6002 configuration registers are divided into eight logical blocks as shown in the LMS6002Dr2 Memory Map. The remaining 4 bits of the instruction are used to address particular registers within the block as detailed in the Memory Map Description. Use address values from the tables.
Write/read cycle waveforms are shown below. Note that write operation is the same for both 3-wire and 4-wire modes. Although not shown in the figures, multiple byte write/read is possible by repeating instruction/data sequence while keeping SEN low.
Write Operation Waveform

Read Operation Waveform, 4-Wire (Default)

Read Operation Waveform, 3-Wire

Memory Map Description
Memory Map
| Address (7 bits) | Description |
|---|---|
| x000:xxxx | Top level configuration (as in Top Level Configuration (User Mode), (Test Mode)) |
| x001:xxxx | TX PLL configuration (as in TX/RX PLL Configuration (User Mode), (Test Mode)) |
| x010:xxxx | RX PLL configuration (as in TX/RX PLL Configuration (User Mode), (Test Mode)) |
| x011:xxxx | TX LPF modules configuration (as in TX LPF Modules Configuration (User Mode), (Test Mode)) |
| x100:xxxx | TX RF modules configuration (as in TX RF Modules Configuration (User Mode), (Test Mode)) |
| x101:xxxx | RX LPF, DAC/ADC modules configuration (as in RX LPF, DAC/ADC Modules Configuration (User Mode), (Test Mode)) |
| x110:xxxx | RX VGA2 configuration (as in RX VGA2 Configuration (User Mode), (Test Mode)) |
| x111:xxxx | RX FE modules configuration (as in RX FE Modules Configuration (User Mode), (Test Mode)) |
Top Level Configuration (User Mode)
| Address (7 bits) | Bits | Description | |||||||||||||||||||||||||||||||||
|---|---|---|---|---|---|---|---|---|---|---|---|---|---|---|---|---|---|---|---|---|---|---|---|---|---|---|---|---|---|---|---|---|---|---|---|
| 0x00 | 7-6 | Not used | |||||||||||||||||||||||||||||||||
| 5-0 | DC_REGVAL[5:0]: Value from DC calibration module selected by DC_ADDR. | ||||||||||||||||||||||||||||||||||
| Read only. | |||||||||||||||||||||||||||||||||||
| 0x01 | 7-5 | RCCAL_LPFCAL[2:0]: Value of the cal_core block in the LPF which calibrates the RC time constant. | |||||||||||||||||||||||||||||||||
| 4-2 | DC_LOCK[2:0]: Lock pattern register.
| ||||||||||||||||||||||||||||||||||
| 1 | DC_CLBR_DONE : indicates calibration status.
| ||||||||||||||||||||||||||||||||||
| 0 | DC_UD: Value from DC module comparator, selected by DC_ADDR
| ||||||||||||||||||||||||||||||||||
| Read only. | |||||||||||||||||||||||||||||||||||
| 0x02 | 7-6 | Not used | |||||||||||||||||||||||||||||||||
| 5-0 | DC_CNTVAL[5:0] : Value to load into selected (by DC_ADDR) DC calibration module. | ||||||||||||||||||||||||||||||||||
| Default: 00011111 | |||||||||||||||||||||||||||||||||||
| 0x03 | 7-6 | Not used. | |||||||||||||||||||||||||||||||||
| 5 | DC_START_CLBR: Start calibration command of the module, selected by DC_ADDR
| ||||||||||||||||||||||||||||||||||
| 4 | DC_LOAD: Load value from DC_CNTVAL to module, selected by DC_ADDR
| ||||||||||||||||||||||||||||||||||
| 3 | DC_SRESET: resets all DC Calibration modules
| ||||||||||||||||||||||||||||||||||
| 2-0 | DC_ADDR[2:0]: Active calibration module address.
| ||||||||||||||||||||||||||||||||||
| Default: 00001000 | |||||||||||||||||||||||||||||||||||
| 0x04 | 7-4 | VER[3:0]: Chip version. | |||||||||||||||||||||||||||||||||
| 3-0 | REV[3:0]: Chip revision. | ||||||||||||||||||||||||||||||||||
| Read only. | |||||||||||||||||||||||||||||||||||
| Default: 00100010 | |||||||||||||||||||||||||||||||||||
| 0x05 | 7 | DECODE:
| |||||||||||||||||||||||||||||||||
| 6 | Not used. | ||||||||||||||||||||||||||||||||||
| 5 | SRESET: DSM soft reset.
| ||||||||||||||||||||||||||||||||||
| 4 | EN: Top modules enable.
| ||||||||||||||||||||||||||||||||||
| 3 | STXEN: Soft transmit enable.
| ||||||||||||||||||||||||||||||||||
| 2 | SRXEN: Soft receive enable.
| ||||||||||||||||||||||||||||||||||
| 1 | TFWMODE: Serial port mode.
| ||||||||||||||||||||||||||||||||||
| 0 | Not used. | ||||||||||||||||||||||||||||||||||
| Default: 00110010 | |||||||||||||||||||||||||||||||||||
| 0x06 | 7-4 | Not used. | |||||||||||||||||||||||||||||||||
| 3 | CLKSEL_LPFCAL: Select the clock for LPF tuning module.
| ||||||||||||||||||||||||||||||||||
| 2 | PD_CLKLPFCAL: Power down on-chip LPF tuning clock generation block.
| ||||||||||||||||||||||||||||||||||
| 1 | ENF_EN_CAL_LPFCAL: Enables the enforce mode. Passes FORCE_CODE_CAL_LPFCAL to RCCAL_LPFCAL.
| ||||||||||||||||||||||||||||||||||
| 0 | RST_CAL_LPFCAL: Reset signal used at the beginning of calibration cycle. Reset signal needs to be longer than 100ns.
| ||||||||||||||||||||||||||||||||||
| Default: 00001101 | |||||||||||||||||||||||||||||||||||
| 0x07 | 7 | EN_CAL_LPFCAL: Enable signal. If =1--> the block is enabled. Should be enabled only when the RC calibration algorithm is running.
| |||||||||||||||||||||||||||||||||
| 6-4 | FORCE_CODE_CAL_LPFCAL[2:0]: Input code coming from software. Will be passed to the output if ENF_EN_CAL_LPFCAL=1.
| ||||||||||||||||||||||||||||||||||
| 3-0 | BWC_LPFCAL[3:0]: LPF bandwidth control. (Set this code to RXLPF BWC if RXLPF and TXLPF have different cut-off frequencies).
| ||||||||||||||||||||||||||||||||||
| Default: 00000000 | |||||||||||||||||||||||||||||||||||
| 0x08 | 7 | Reserved.
| |||||||||||||||||||||||||||||||||
| 6 | LBEN_LPFIN: BB loopback enable. If =1, TX BB loopback signal is connected to RXLPF input. If enabled, RXTIA should be disabled (powered down)
| ||||||||||||||||||||||||||||||||||
| 5 | LBEN_VGA2IN: BB loopback enable. If =1, TX BB loopback signal is connected to RXVGA2 input. If enabled, LPF should be disabled (powered down).
| ||||||||||||||||||||||||||||||||||
| 4 | LBEN_OPIN: BB loopback enable. If =1, TX BB loopback signal is connected to the RX output pins. If enabled, RXLPF and RXVGA2 should be disabled (powered down)
| ||||||||||||||||||||||||||||||||||
| 3-0 | LBRFEN[3:0]: RF loop back control. When activated, LNAs should be disabled (powered down).
| ||||||||||||||||||||||||||||||||||
| Default: 00000000 | |||||||||||||||||||||||||||||||||||
| 0x09 | 7 | RXOUTSW: RX out/ADC in high-Z switch control.
| |||||||||||||||||||||||||||||||||
| 6-0 | CLK_EN[6:0]: Clock distribution control. | ||||||||||||||||||||||||||||||||||
| 6 | CLK_EN [6]
| ||||||||||||||||||||||||||||||||||
| 5 | CLK_EN [5]
| ||||||||||||||||||||||||||||||||||
| 4 | CLK_EN [4]
| ||||||||||||||||||||||||||||||||||
| 3 | CLK_EN [3]
| ||||||||||||||||||||||||||||||||||
| 2 | CLK_EN [2]
| ||||||||||||||||||||||||||||||||||
| 1 | CLK_EN [1]
| ||||||||||||||||||||||||||||||||||
| 0 | CLK_EN [0]
| ||||||||||||||||||||||||||||||||||
| Default: 01000000 | |||||||||||||||||||||||||||||||||||
| 0x0A | 7-2 | Not used. | |||||||||||||||||||||||||||||||||
| 1 | FDDTDD: Frequency/Time division duplexing selection.
| ||||||||||||||||||||||||||||||||||
| 0 | TDDMOD: TDD mode selection if FDDTDD=1.
| ||||||||||||||||||||||||||||||||||
| Default: 00000000 |
Top Level Configuration (Test Mode)
| Address (7 bits) | Bits | Description |
|---|---|---|
| 0x0B | 7-5 | Not used. |
| 4 | PDXCOBUF: XCO buffer power down.
| |
| 3 | SLFBXCOBUF: XCO buffer self-biasing control.
| |
| 2 | BYPXCOBUF: XCO buffer bypass.
| |
| 1-0 | PD[1:0]: Power down control for top modules.
PD[1]
PD[0]
| |
| Default: 00001000 | ||
| 0x0E- | 5-0 | 00000001 – v1 |
| Read only. | ||
| 0x0F | 7-0 | SPARE1[7:0]: Spare configuration register. |
| Default: 00000000 |
TX/RX PLL Configuration (User Mode)
| Address (7 bits) | Bits | Description |
|---|---|---|
| Tx: 0x10, Rx: 0x20 | 7-0 | NINT[8:1]: Integer part of the divider (MSBs).* |
| Default: ”01000001“0, NINT=130. | ||
| Tx: 0x11, Rx: 0x21 | 7 | NINT[0]: Integer part of the divider (LSB).* |
| 6-0 | NFRAC[22:16]: Fractional part of the divider* | |
| Tx: 0x12, Rx: 0x22 | 7-0 | NFRAC[15:8] * |
| Tx: 0x13, Rx: 0x23 | 7-0 | NFRAC[7:0] * |
| Default: 0”010…0”, NFRAC=0.25, fVCO=130.25*40MHz=5.21GHz. | ||
| Tx: 0x14, Rx: 0x24 | 7 | DITHEN: Dithering control.
|
| 6-4 | DITHN[2:0]: How many bits to dither if DITHEN=1
| |
| 3 | EN: PLL enable.
| |
| 2 | AUTOBYP: Delta sigma auto bypass when NFRAC = 0.
| |
| 1 | DECODE.
| |
| 0 | Reserved
| |
| Default: “10001000” | ||
| Tx: 0x15, Rx: 0x25 | 7-4 | SELVCO[2:0]: VCO selection.
|
| 4-2 | FRANGE[2:0]: PLL output frequency range selection.
| |
| 1-0 | SELOUT[1:0]: Select output buffer in RX PLL, not used in TX PLL.
| |
| Default: “10110001” | ||
| Tx: 0x16, Rx: 0x26 | 7 | EN_PFD_UP: Enable PFD UP pulses.
|
| 6 | OEN_TSTD_SX.
| |
| 5 | PASSEN_TSTOD_SD.
| |
| 4-0 | CHP[4:0]: Charge pump current. Binary coded, LSB = 100uA.
| |
| Default: “10001100”, ICHP = 1.2mA | ||
| Tx: 0x17, Rx: 0x27 | 7 | BYPVCOREG: Bypass VCO regulator.
|
| 6 | PDVCOREG: VCO regulator power down.
| |
| 5 | FSTVCOBG: VCO regulator band gap settling time control. Shorts the resistor in band gap to speed up charging for faster response. After the initial charge up, it should be disabled.
| |
| 4-0 | OFFUP[4:0]: Charge pump UP offset current. Binary coded, LSB = 10uA.
| |
| Default: “11100000” = 0mA. | ||
| Tx: 0x18, Rx: 0x28 | 7-5 | VOVCOREG[3:1]: VCO regulator output voltage control, 3 MSBs. LSB=100mV, VOVCOREG[3:0] coded as below.
|
| 4-0 | OFFDOWN[4:0]: Charge pump DOWN offset current. Binary coded, LSB = 10uA.
| |
| Default: “01000000” = 0mA. | ||
| Tx: 0x19, Rx: 0x29 | 7 | VOVCOREG[0]: VCO regulator output voltage control, LSB. |
| 6 | Not used. | |
| 5-0 | VCOCAP[5:0]: Switch capacitance programming. Binary coded.
| |
| Default: “10010100", VCOCAP=20 |
- Shadow registered
TX/RX PLL Configuration (Test Mode)
| Address (7 bits) | Bits | Description |
|---|---|---|
| Tx: 0x1A, Rx: 0x2A | 7 | VTUNE_H (Read Only): Value from Vtune comparator. |
| 6 | VTUNE_L (Read Only): Value from Vtune comparator. | |
| 5-0 | Reserved
| |
| Default: “00000011” | ||
| Tx: 0x1B, Rx: 0x2B | 7-4 | Reserved
|
| 3 | PD_VCOCOMP_SX: VCO Comparator enable.
| |
| 2 | Reserved.
| |
| 1 | Reserved.
| |
| 0 | Reserved.
| |
| Default: “01110110”, A value = 0, (N=130). | ||
| Tx: 0x1C, Rx: 0x2C | 7-0 | Reserved. |
| Default: “00111000” | ||
| Tx: 0x1D, Rx: 0x2D | 7-0 | Reserved. |
| Read only. | ||
| Tx: 0x1E, Rx: 0x2E | 7-0 | Reserved. |
| Read only. | ||
| Tx: 0x1F, Rx: 0x2F | 7-0 | Reserved. |
| Read only. |
TX LPF Modules Configuration (User Mode)
| Address (7 bits) | Bits | Description | |||||||||||||||||||||||||||||||||
|---|---|---|---|---|---|---|---|---|---|---|---|---|---|---|---|---|---|---|---|---|---|---|---|---|---|---|---|---|---|---|---|---|---|---|---|
| 0x30 | 7-6 | Not used. | |||||||||||||||||||||||||||||||||
| 5-0 | DC_REGVAL[5:0]: Value from DC calibration module selected by DC_ADDR. | ||||||||||||||||||||||||||||||||||
| Read only. | |||||||||||||||||||||||||||||||||||
| 0x31 | 7-5 | Not used. | |||||||||||||||||||||||||||||||||
| 4-2 | DC_LOCK[2:0]: Lock pattern register.
| ||||||||||||||||||||||||||||||||||
| 1 | DC_CLBR_DONE: indicates calibration status.
| ||||||||||||||||||||||||||||||||||
| 0 | DC_UD: Value from DC module comparator, selected by DC_ADDR.
| ||||||||||||||||||||||||||||||||||
| Read only. | |||||||||||||||||||||||||||||||||||
| 0x32 | 7-6 | Not used. | |||||||||||||||||||||||||||||||||
| 5-0 | DC_CNTVAL[5:0]: Value to load into selected (by DC_ADDR) DC calibration module. | ||||||||||||||||||||||||||||||||||
| Default: 00011111 | |||||||||||||||||||||||||||||||||||
| 0x33 | 7-6 | Not used. | |||||||||||||||||||||||||||||||||
| 5 | DC_START_CLBR: Start calibration command of module selected by DC_ADDR.
| ||||||||||||||||||||||||||||||||||
| 4 | DC_LOAD: Load value from DC_CNTVAL to module, selected by DC_ADDR.
| ||||||||||||||||||||||||||||||||||
| 3 | DC_SRESET: Resets all DC Calibration modules.
| ||||||||||||||||||||||||||||||||||
| 2-0 | DC_ADDR[2:0]: Active calibration module address.
| ||||||||||||||||||||||||||||||||||
| Default: 00001000 | |||||||||||||||||||||||||||||||||||
| 0x34 | 7-6 | Not used. | |||||||||||||||||||||||||||||||||
| 5-2 | BWC_LPF[3:0]: LPF bandwidth control.
| ||||||||||||||||||||||||||||||||||
| 1 | EN : LPF modules enable.
| ||||||||||||||||||||||||||||||||||
| 0 | DECODE.
| ||||||||||||||||||||||||||||||||||
| Default: 00000010 | |||||||||||||||||||||||||||||||||||
| 0x35
DCO_DACCAL_LPF renamed, no action required. |
7 | Not used. | |||||||||||||||||||||||||||||||||
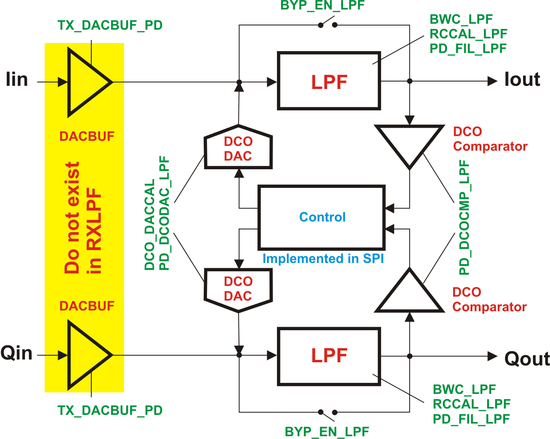
| 6 | BYP_EN_LPF: LPF bypass enable.
| ||||||||||||||||||||||||||||||||||
| 5-0 | DCO_DACCAL[5:0]: Resistor calibration control for the DC offset cancellation DAC.
| ||||||||||||||||||||||||||||||||||
| Default: 00001100 |
TX LPF Modules Configuration (Test Mode)
| Address (7 bits) | Bits | Description |
|---|---|---|
| 0x36 | 7 | TX_DACBUF_PD: TX data DAC buffers power down.
|
| 6-4 | RCCAL_LPF[2:0]: Calibration value, coming from TRX_LPF_CAL module.
| |
| 3 | Not used. | |
| 2 | PD_DCODAC_LPF: Power down for the DAC in the DC offset cancellation block.
| |
| 1 | PD_DCOREF_LPF: Power down signal for the dc_ref_con3 block.
| |
| 0 | PD_FIL_LPF: Power down for the filter.
| |
| Default: 00110000 | ||
| 0x3E | 7-0 | SPARE0[7:0]: Spare configuration register. |
| Default: 00000000 | ||
| 0x3F | 7 | PD_DCOCMP_LPF: Power down DC offset comparators in DC offset cancellation block. Should be powered up only when DC offset cancellation algorithm is running.
|
| 6-0 | SPARE1[6:0]: Spare configuration register | |
| Default: 00000000 |
RX LPF, DAC/ADC Modules Configuration (User Mode)
| Address (7 bits) | Bits | Description | |||||||||||||||||||||||||||||||||
|---|---|---|---|---|---|---|---|---|---|---|---|---|---|---|---|---|---|---|---|---|---|---|---|---|---|---|---|---|---|---|---|---|---|---|---|
| 0x50 | 7-6 | Not used. | |||||||||||||||||||||||||||||||||
| 5-0 | DC_REGVAL[5:0]: Value from DC Calibration module, selected by DC_ADDR. | ||||||||||||||||||||||||||||||||||
| Read only. | |||||||||||||||||||||||||||||||||||
| 0x51 | 7-5 | Not used. | |||||||||||||||||||||||||||||||||
| 4-2 | DC_LOCK[2:0]: Lock pattern register.
| ||||||||||||||||||||||||||||||||||
| 1 | DC_CLBR_DONE: indicates calibration status.
| ||||||||||||||||||||||||||||||||||
| 0 | DC_UD: Value from DC module comparator, selected by DC_ADDR.
| ||||||||||||||||||||||||||||||||||
| Read only. | |||||||||||||||||||||||||||||||||||
| 0x52 | 7-6 | Not used. | |||||||||||||||||||||||||||||||||
| 5-0 | DC_CNTVAL[5:0] : Value to load into selected (by DC_ADDR) DC calibration module. | ||||||||||||||||||||||||||||||||||
| Default: 00011111 | |||||||||||||||||||||||||||||||||||
| 0x53 | 7-6 | Not used. | |||||||||||||||||||||||||||||||||
| 5 | DC_START_CLBR: Start calibration command of the module, selected by DC_ADDR.
| ||||||||||||||||||||||||||||||||||
| 4 | DC_LOAD: Load value from DC_CNTVAL to module, selected by DC_ADDR.
| ||||||||||||||||||||||||||||||||||
| 3 | DC_SRESET: resets all DC Calibration modules.
| ||||||||||||||||||||||||||||||||||
| 2-0 | DC_ADDR[3:0]: Active calibration module address.
| ||||||||||||||||||||||||||||||||||
| Default: 00001000 | |||||||||||||||||||||||||||||||||||
| 0x54 | 7-6 | Not used. | |||||||||||||||||||||||||||||||||
| 5-2 | BWC_LPF[3:0]: LPF bandwidth control.
| ||||||||||||||||||||||||||||||||||
| 1 | EN : LPF modules enable.
| ||||||||||||||||||||||||||||||||||
| 0 | DECODE.
| ||||||||||||||||||||||||||||||||||
| Default: 00000010 | |||||||||||||||||||||||||||||||||||
| 0x55 | 7 | Not used. | |||||||||||||||||||||||||||||||||
| 6 | BYP_EN_LPF: LPF bypass enable.
| ||||||||||||||||||||||||||||||||||
| 5-0 | DCO_DACCAL[5:0]: Resistor calibration control for the DC offset cancellation DAC.
| ||||||||||||||||||||||||||||||||||
| Default: 00001100 | |||||||||||||||||||||||||||||||||||
| 0x57 | 7 | EN_ADC_DAC : ADC/DAC modules enable.
| |||||||||||||||||||||||||||||||||
| 6 | DECODE.
| ||||||||||||||||||||||||||||||||||
| 5-3 | TX_CTRL1[6:4]. DAC Internal Output Load Resistor Control Bits.
| ||||||||||||||||||||||||||||||||||
| 2 | TX_CTRL1[3]. DAC Reference Current Resistor.
| ||||||||||||||||||||||||||||||||||
| 1-0 | TX_CTRL1[1:0]. DAC Full Scale Output Current Control (single-ended).
| ||||||||||||||||||||||||||||||||||
| Default: 10010100 | |||||||||||||||||||||||||||||||||||
| 0x58 | 7-6 | RX_CTRL1[7:6]. Reference bias resistor adjust.
| |||||||||||||||||||||||||||||||||
| 5-4 | RX_CTRL1[5:4]. Reference bias UP.
| ||||||||||||||||||||||||||||||||||
| 3-0 | RX_CTRL1[3:0]. Reference bias DOWN.
| ||||||||||||||||||||||||||||||||||
| Default: 00000000 | |||||||||||||||||||||||||||||||||||
| 0x59 | 7 | Not used. | |||||||||||||||||||||||||||||||||
| 6-5 | RX_CTRL2[7:6]. Reference Gain Adjust.
| ||||||||||||||||||||||||||||||||||
| 4-3 | RX_CTRL2[5:4]. Common Mode Adjust.
| ||||||||||||||||||||||||||||||||||
| 2-1 | RX_CTRL2[3:2]. Reference Buffer Boost.
| ||||||||||||||||||||||||||||||||||
| 0 | RX_CTRL2[0]. ADC Input Buffer Disable.
| ||||||||||||||||||||||||||||||||||
| Default: 00000001 | |||||||||||||||||||||||||||||||||||
| 0x5A | 7 | MISC_CTRL[9]. Rx Fsync Polarity, frame start.
| |||||||||||||||||||||||||||||||||
| 6 | MISC_CTRL[8]. Rx Interleave Mode.
| ||||||||||||||||||||||||||||||||||
| 5 | MISC_CTRL[7]. DAC Clk Edge Polarity.
| ||||||||||||||||||||||||||||||||||
| 4 | MISC_CTRL[6]. Tx Fsync Polarity, frame start.
| ||||||||||||||||||||||||||||||||||
| 3 | MISC_CTRL[5]. Tx Interleave Mode.
| ||||||||||||||||||||||||||||||||||
| 2 | RX_CTRL3[7]. ADC Sampling Phase Select.
| ||||||||||||||||||||||||||||||||||
| 1-0 | RX_CTRL3[1:0]. Clock Non-Overlap Adjust.
| ||||||||||||||||||||||||||||||||||
| Default: 00100000 | |||||||||||||||||||||||||||||||||||
| 0x5B | 7-6 | RX_CTRL4[7:6] ADC bias resistor adjust.
| |||||||||||||||||||||||||||||||||
| 5-4 | RX_CTRL4[5:4]. Main bias DOWN.
| ||||||||||||||||||||||||||||||||||
| 3-2 | RX_CTRL4[3:2]. ADC Amp1 stage1 bias UP.
| ||||||||||||||||||||||||||||||||||
| 1-0 | RX_CTRL4[1:0]. ADC Amp2-4 stage1 bias UP.
| ||||||||||||||||||||||||||||||||||
| Default: 00000000 | |||||||||||||||||||||||||||||||||||
| 0x5C | 7-6 | RX_CTRL5[7:6] ADC Amp1 stage2 bias UP.
| |||||||||||||||||||||||||||||||||
| 5-4 | RX_CTRL5[5:4]. ADC Amp2-4 stage2 bias UP.
| ||||||||||||||||||||||||||||||||||
| 3-2 | RX_CTRL5[3:2]. Quantizer bias UP.
| ||||||||||||||||||||||||||||||||||
| 1-0 | RX_CTRL5[1:0]. Input Buffer bias UP.
| ||||||||||||||||||||||||||||||||||
| Default: 00000000 | |||||||||||||||||||||||||||||||||||
| 0x5D | 7-4 | REF_CTRL0[7:4]. Bandgap Temperature Coefficient Control.
| |||||||||||||||||||||||||||||||||
| 3-0 | REF_CTRL0[3:0]. Bandgap Gain Control.
| ||||||||||||||||||||||||||||||||||
| Default: 00000000 | |||||||||||||||||||||||||||||||||||
| 0x5E | 7-6 | REF_CTRL1[7:6]. Reference Amps bias adjust.
| |||||||||||||||||||||||||||||||||
| 5-4 | REF_CTRL1[5:4]. Reference Amps bias UP.
| ||||||||||||||||||||||||||||||||||
| 3-0 | REF_CTRL1[3:0]. Reference Amps bias DOWN.
| ||||||||||||||||||||||||||||||||||
| Default: 00000000 | |||||||||||||||||||||||||||||||||||
| 0X5F | 7 | PD_DCOCMP_LPF: Power down DC offset comparators in DC offset cancellation block. Should be powered up only when DC offset cancellation algorithm is running.
| |||||||||||||||||||||||||||||||||
| 6-5 | SPARE00[6:5]: Spare configuration bits.
| ||||||||||||||||||||||||||||||||||
| 4 | MISC_CTRL[4]. Enable DAC.
| ||||||||||||||||||||||||||||||||||
| 3 | MISC_CTRL[3]. Enable ADC1 (I Channel).
| ||||||||||||||||||||||||||||||||||
| 2 | MISC_CTRL[2]. Enable ADC2 (Q Channel).
| ||||||||||||||||||||||||||||||||||
| 1 | MISC_CTRL[1]. Enable ADC reference.
| ||||||||||||||||||||||||||||||||||
| 0 | MISC_CTRL[0]. Enable master reference.
| ||||||||||||||||||||||||||||||||||
| Default: 00011111 |
RX LPF, DAC/ADC Modules Configuration (Test Mode)
| Address (7 bits) | Bits | Description |
|---|---|---|
| 0x56 | 7 | TX_DACBUF_PD: Not used. |
| 6-4 | RCCAL_LPF[2:0]: Calibration value, coming from TRX_LPF_CAL module.
| |
| 3 | Not used. | |
| 2 | PD_DCODAC_LPF: Power down for the DAC in the DC offset cancellation block.
| |
| 1 | PD_DCOREF_LPF: Power down signal for the dc_ref_con3 block.
| |
| 0 | PD_FIL_LPF: Power down for the filter.
| |
| Default: 00110000 |
TX RF Modules Configuration (User Mode)
| Address (7 bits) | Bits | Description | |||||||||||||||
|---|---|---|---|---|---|---|---|---|---|---|---|---|---|---|---|---|---|
| 0x40 | 7-2 | Not used. | |||||||||||||||
| 1 | EN : TXRF modules enable
| ||||||||||||||||
| 0 | DECODE:
| ||||||||||||||||
| 0x41 | 7-5 | Not used. | |||||||||||||||
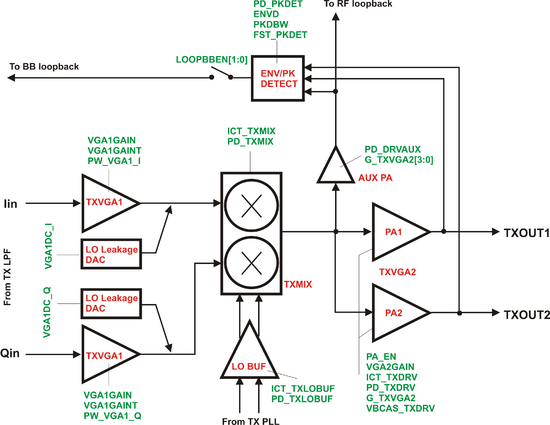
| 4-0 | VGA1GAIN[4:0]: TXVGA1 gain, log-linear control. LSB=1dB, encoded as shown below.
| ||||||||||||||||
| Default: 00010101 | |||||||||||||||||
| 0x42 | 7-0 | VGA1DC_I[7:0]: TXVGA1 DC shift control, LO leakage cancellation. LSB=0.0625mV, encoded as shown below.
| |||||||||||||||
| Default: 10000000 | |||||||||||||||||
| 0x43 | 7-0 | VGA1DC_Q[7:0]: TXVGA1 DC shift control, LO leakage cancellation LSB=0.0625mV, encoded as shown below.
| |||||||||||||||
| Default: 10000000 | |||||||||||||||||
| 0x44 | 7-5 | Not used. | |||||||||||||||
| 4-3 | PA_EN[2:0]: VGA2 power amplifier (TX output) selection.
| ||||||||||||||||
| 2 | PA_EN[2]: AUXPA, auxiliary (RF loopack) PA power down.
| ||||||||||||||||
| 1-0 | Not used. | ||||||||||||||||
| Default: 00001011 | |||||||||||||||||
| 0x45 | 7-3 | VGA2GAIN[4:0]: TXVGA2 gain control, log-linear control. LSB=1dB, encoded as shown below.
| |||||||||||||||
| 2-0 | ENVD[2:0]: Controls envelop/peak detector analogue MUX.
| ||||||||||||||||
| Default: 00000000 | |||||||||||||||||
| 0x46 | 7-4 | PKDBW[3:0]: Controls the bandwidth of the envelop and peak detectors.
| |||||||||||||||
| 3-2 | LOOPBBEN[1:0]: Base band loopback switches control.
| ||||||||||||||||
| 1 | FST_PKDET: Shorts the resistor in the envelop/peak detector to speed up charging for faster response. After the initial charge up, it should be disabled to achieve a LPF function.
| ||||||||||||||||
| 0 | FST_TXHFBIAS: Bias stage of high frequency TX part has large resistors to filter the noise. However, they create large settling time. This switch can be used to short those resistors during the initialization and then it may be needed to open it to filter the noise, in case the noise is too high.
| ||||||||||||||||
| Default: 00000000 | |||||||||||||||||
| 0x47 | 7-4 | ICT_TXLOBUF[3:0]: Controls the bias current of the LO buffer. Higher current will increase the linearity. LSB=5/6mA.
| |||||||||||||||
| 3-0 | VBCAS_TXDRV[3:0]: The linearity of PAs depends on the bias at the base of the cascode NPNs in the PA cells. Increasing the VBCAS will lower the base of the cascode NPN.
| ||||||||||||||||
| Default: 01100000 | |||||||||||||||||
| 0x48 | 7-5 | Not used. | |||||||||||||||
| 4-0 | ICT_TXMIX[4:0]: Controls the bias current of the mixer. Higher current will increase the linearity. LSB=1mA.
| ||||||||||||||||
| Default: 00001100 | |||||||||||||||||
| 0x49 | 7-5 | Not used. | |||||||||||||||
| 4-0 | ICT_TXDRV[4:0]: Controls the bias current of the PAs. Higher current will increase the linearity. LSB=1mA.
| ||||||||||||||||
| Default: 00001100 |
TX RF Modules Configuration (Test Mode)
| Address (7 bits) | Bits | Description | ||||||||||||||||
|---|---|---|---|---|---|---|---|---|---|---|---|---|---|---|---|---|---|---|
| 0x4A | 7-5 | Not used. | ||||||||||||||||
| 4 | PW_VGA1_I: VGA1, I channel power control.
| |||||||||||||||||
| 3 | PW_VGA1_Q: VGA1, Q channel power control.
| |||||||||||||||||
| 2 | PD_TXDRV: Power down for PAs and AUXPA.
| |||||||||||||||||
| 1 | PD_TXLOBUF: Power down for TXLOBUF.
| |||||||||||||||||
| 0 | PD_TXMIX: Power down for TXMIX.
| |||||||||||||||||
| Default: 00011000 | ||||||||||||||||||
| 0x4B | 7-0 | VGA1GAINT[7:0]: TXVGA1 gain control, raw access. LSB=1dB, encoded as shown below.
| ||||||||||||||||
| Default: 01010000 | ||||||||||||||||||
| 0x4C | 7-0 | G_TXVGA2[8:1]: Controls the gain of PA1, PA2 and AUXPA, raw access.
| ||||||||||||||||
| Default: 00000000, 0dB gain. | ||||||||||||||||||
| 0x4D | 7 | PD_PKDET: Power down for envelop/peak detectors.
| ||||||||||||||||
| 6-0 | SPARE0[6:0]: Spare configuration register. | |||||||||||||||||
| Default: 00000000 | ||||||||||||||||||
| 0x4F | 7-0 | SPARE1[7:0]: Spare configuration register. | ||||||||||||||||
| Default: 00000000 |
RX VGA2 Configuration (User Mode)
| Address (7 bits) | Bits | Description | |||||||||||||||||||||||||||||||
|---|---|---|---|---|---|---|---|---|---|---|---|---|---|---|---|---|---|---|---|---|---|---|---|---|---|---|---|---|---|---|---|---|---|
| 0x60 | 7-6 | Not used. | |||||||||||||||||||||||||||||||
| 5-0 | DC_REGVAL[5:0]: Value from DC Calibration module selected by DC_ADDR. | ||||||||||||||||||||||||||||||||
| Read Only. | |||||||||||||||||||||||||||||||||
| 0x61 | 7-5 | Not used. | |||||||||||||||||||||||||||||||
| 4-2 | DC_LOCK[2:0]: Lock pattern register.
| ||||||||||||||||||||||||||||||||
| 1 | DC_CLBR_DONE : indicates calibration status.
| ||||||||||||||||||||||||||||||||
| 0 | DC_UD: Value from DC module comparator, selected by DC_ADDR
| ||||||||||||||||||||||||||||||||
| Read only. | |||||||||||||||||||||||||||||||||
| 0x62 | 7-6 | Not used | |||||||||||||||||||||||||||||||
| 5-0 | DC_CNTVAL[5:0] : Value to load into selected (by DC_ADDR) DC calibration module. | ||||||||||||||||||||||||||||||||
| Default: 00011111 | |||||||||||||||||||||||||||||||||
| 0x63 | 7-6 | Not used. | |||||||||||||||||||||||||||||||
| 5 | DC_START_CLBR: Start calibration command of the module, selected by DC_ADDR.
| ||||||||||||||||||||||||||||||||
| 4 | DC_LOAD: Load value from DC_CNTVAL to module, selected by DC_ADDR.
| ||||||||||||||||||||||||||||||||
| 3 | DC_SRESET: resets all DC Calibration modules.
| ||||||||||||||||||||||||||||||||
| 2-0 | DC_ADDR[2:0]: Active calibration module address.
| ||||||||||||||||||||||||||||||||
| Default: 00001000 | |||||||||||||||||||||||||||||||||
| 0x64 | 7-6 | Not used. | |||||||||||||||||||||||||||||||
| 5-2 | VCM[3:0]: RXVGA2 output common mode voltage control. VCM[3] – sign, VCM[2:0] – magnitude, LSB=40mV.
| ||||||||||||||||||||||||||||||||
| 1 | EN :RXVGA2 modules enable.
| ||||||||||||||||||||||||||||||||
| 0 | DECODE:
| ||||||||||||||||||||||||||||||||
| Default: 00011110 | |||||||||||||||||||||||||||||||||
| 0x65 | 7-5 | Not used. | |||||||||||||||||||||||||||||||
| 4-0 | VGA2GAIN[4:0]: RXVGA2 gain control. LSB=3dB, encoded as shown below.
Not recommended to be used above 30dB. | ||||||||||||||||||||||||||||||||
| Default: 00000001 |
RX VGA2 Configuration (Test Mode)
| Address (7 bits) | Bits | Description | ||||||||||||
|---|---|---|---|---|---|---|---|---|---|---|---|---|---|---|
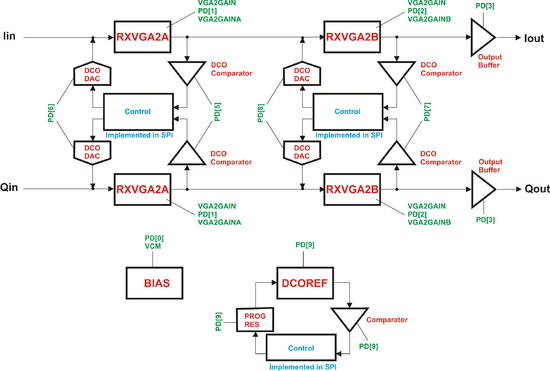
| 0x66 | PD[9:0]: Power down different modules. | |||||||||||||
| 7-6 | Not used. | |||||||||||||
| 5 | PD[9] - DC current regulator.
| |||||||||||||
| 4 | PD[8] - DC calibration DAC for VGA2B.
| |||||||||||||
| 3 | Not used. | |||||||||||||
| 2 | PD[6] - DC calibration DAC for VGA2A.
| |||||||||||||
| 1 | Not used. | |||||||||||||
| 0 | PD[4] - Band gap.
| |||||||||||||
| Default: 00000000 | ||||||||||||||
| 0x67 | 7-4 | Not used. | ||||||||||||
| 3 | PD[3] – Output buffer in both RXVGAs.
| |||||||||||||
| 2 | PD[2] - RXVGA2B.
| |||||||||||||
| 1 | PD[1] - RXVGA2A.
| |||||||||||||
| 0 | PD[0] - Current reference.
| |||||||||||||
| Default: 00000000 | ||||||||||||||
| 0x68 | 7-4 | VGA2GAINB: Controls the gain of second VGA2 stage (VGA2B). LSB=3dB, encoded as shown below.
| ||||||||||||
| 3-0 | VGA2GAINA: Controls the gain of first VGA2 stage (VGA2A). LSB=3dB, encoded as shown below.
| |||||||||||||
| Default: 00000001 | ||||||||||||||
| 0x6E | 7 | PD[7] - DC calibration comparator for VGA2B.
| ||||||||||||
| 6 | PD[6] - DC calibration comparator for VGA2A.
| |||||||||||||
| 5-0 | SPARE0[5:0]: Spare configuration register. | |||||||||||||
| Default: 00000000 | ||||||||||||||
| 0x6F | 7-0 | SPARE1[7:0]: Spare configuration register. | ||||||||||||
| Default: 00000000 |
RX FE Modules Configuration (User Mode)
| Address (7 bits) | Bits | Description |
|---|---|---|
| 0x70 | 7-2 | Not used. |
| 1 | DECODE.
| |
| 0 | EN: RXFE modules enable.
| |
| Default: 00000001 | ||
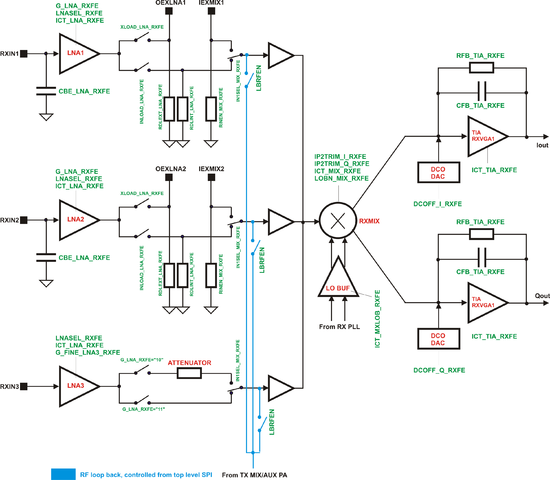
| 0x71 | 7 | IN1SEL_MIX_RXFE: Selects the input to the mixer.
|
| 6-0 | DCOFF_I_RXFE[6:0]: DC offset cancellation, I channel.
| |
| Default: 10000000 | ||
| 0x72 | 7 | INLOAD_LNA_RXFE: To select the internal load for the LNA.
|
| 6-0 | DCOFF_Q_RXFE[6:0]: DC offset cancellation, Q channel.
| |
| Default: 10000000 | ||
| 0x73 | 7 | XLOAD_LNA_RXFE: To select the external load for the LNA.
|
| 6-0 | IP2TRIM_I_RXFE[6:0]: IP2 cancellation, I channel.
| |
| Default: 00000000 | ||
| 0x75 | 7-6 | G_LNA_RXFE[1:0]: LNA gain mode control.
|
| 5-4 | LNASEL_RXFE[1:0]: Selects the active LNA.
| |
| 3-0 | CBE_LNA_RXFE[3:0]: Controls the capacitance parallel to the BE of the input NPN transistors. To be used at lower frequencies for easier matching. For LNA1 and LNA2 only.
| |
| Default: 11010000 | ||
| 0x76 | 7 | Not used. |
| 6-0 | RFB_TIA_RXFE[6:0]: Feedback resistor control of the TIA (RXVGA1) to set the mixer gain.
| |
| Default: 01111000 | ||
| 0x77 | 7 | Not used. |
| 6-0 | CFB_TIA_RXFE[6:0]: Feedback capacitor for the TIA (RXVGA1) to limit the BW.
This cap is supposed to be set according to the RC time constant to have almost constant BW over the corners for optimum CDMA performance. Software will control it using the information from the LPF calibration circuit. | |
| Default: 00000000 | ||
| 0x78 | 7-6 | Not used. |
| 5-0 | RDLEXT_LNA_RXFE[5:0]: Controls the on-chip LNA load resistor for the external load mode of the LNA. In practice, this will be set to high value, the output will be ac coupled, and the actual load is defined on PCB.
| |
| Default: 00011100 | ||
| 0x79 | 7-6 | Not used. |
| 5-0 | RDLINT_LNA_RXFE[5:0]: Controls the on-chip LNA load resistor for the internal load mode of the LNA, LNA1 and LNA2.
| |
| Default: 00011100 | ||
| 0x7A | 7-4 | ICT_MIX_RXFE[3:0]: Control for tweaking the bias current for mixer.
|
| 3-0 | ICT_LNA_RXFE[3:0]: Control for tweaking the bias current for LNA.
| |
| Default: 01110111 | ||
| 0x7B | 7-4 | ICT_TIA_RXFE[3:0]: Control for tweaking the bias current for TIA (RXVGA1).
|
| 3-0 | ICT_MXLOB_RXFE[3:0]: Control for tweaking the bias current for mixer LO buffer.
| |
| Default: 01110111 | ||
| 0x7C | 7 | Not used. |
| 6-3 | LOBN_MIX_RXFE[3:0]: Tweak for the LO bias of the mixer for optimum linearity.
| |
| 2 | RINEN_MIX_RXFE: Termination resistor on external mixer input enable.
| |
| 1-0 | G_FINE_LNA3_RXFE[1:0]: LNA3 fine gain adjustment.
| |
| Default: 00011000 |
RX FE Modules Configuration (Test Mode)
| Address (7 bits) | Bits | Description |
|---|---|---|
| 0x7D | 7-4 | Not used. |
| 3 | PD_TIA_RXFE: TIA (RXVGA1) power down.
| |
| 2 | PD_MXLOB_RXFE: Mixer LO buffer power down.
| |
| 1 | PD_MIX_RXFE: Mixer power down.
| |
| 0 | PD_LNA_RXFE: LNA power down.
| |
| Default: 00000000 | ||
| 0x7E | 7-0 | SPARE0[7:0] |
| Default: 00000000 | ||
| 0x7F | 7-0 | SPARE1[7:0] |
| Default: 00000000 |
Control Block Diagrams
SPI Read/Write Pseudocode
//----------------------------------------------------------------------------
// Write command, SPI module address, register address
// Read data
//----------------------------------------------------------------------------
void SPI_Read(BYTE COMMAND)
{
	BYTE DATA;	//We will read data there

	//Write Command and Address (MSB First)
//First 1 bit (MSB)  = Command
//Next 3 bits  = SPI memory block address
//Next 4 (LSBs) bits = Register Address
	for(int i=7; i>=0; i--)
	{
		if(i’th bit in COMMAND is ‘1’)
		{
			Set Data Output line to ‘1’;
		}
		else
		{
			Set Data Output line to ‘0’;
		};
		Apply Rising and Falling CLK signal edges to CLK line;
	};

	//Read Data (MSB First)
	//Note: At this point we have data MSB valid from the chip.
	for(int i=7; i>=0; i--)
	{
		if(there is ‘1’ at the Data Input Line)
		{
			Set i’th bit in DATA ‘1’;
		}
		else
		{
			Set i’th bit in DATA ‘0’;
};
		Apply Rising and Falling CLK signal edges to CLK line;
	};
};

//----------------------------------------------------------------------------
// Write data to the chip:
// First byte: Command, SPI module address, register address
// Second byte: Data
//----------------------------------------------------------------------------
void SPI_Write(BYTE COMMAND, BYTE DATA)
{
	//Write Command, Address
	for(int i=7; i>=0; i--)
	{
		if(i’th bit in COMMAND is ‘1’)
		{
			Set Data Output line to ‘1’;
		}
		else
		{
			Set Data Output line to ‘0’;
		};
		Apply Rising and Falling CLK signal edges to CLK line;
	};

	//Write Data
	for(int i=7; i>=0; i--)
	{
		if(i’th bit in DATA is ‘1’)
		{
			Set Data Output line to ‘1’;
		}
		else
		{
			Set Data Output line to ‘0’;
		};
		Apply Rising and Falling CLK signal edges to CLK line;
	};
};
Loopback and Bypass Modes
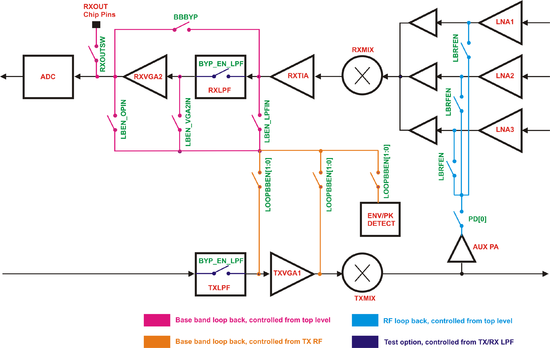
Envelop and Pick Detector Multiplexer
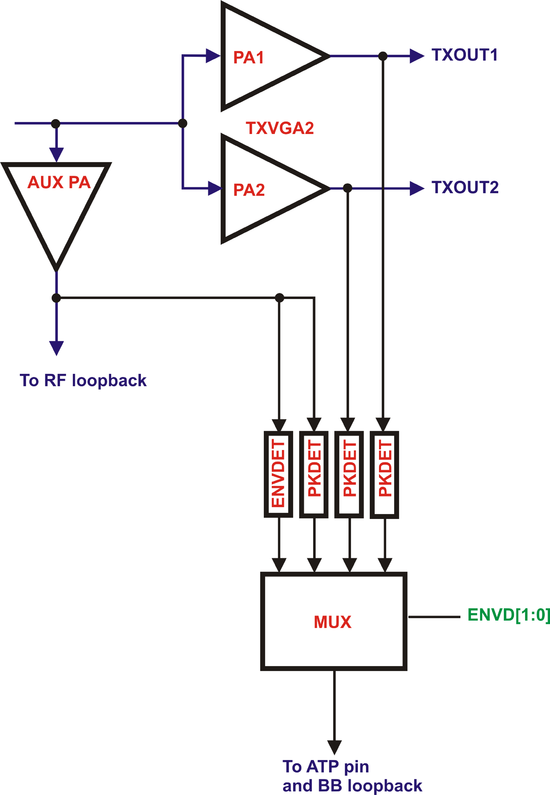
TX/RX PLL
The frequency setting for both TX and RX PLLs is the same as described here. TX PLL SPI registers are at x001xxxx and TX PLL registers are at x010xxxx.
To configure the PLL there are a number of variables which need to be set.
- Integer and fractional part of the divider.
- FRANGE value.
- VCO CAP, charge pump current (Icp) and charge pump offset current (Ioff).
This assumes the given loop filter value with a loop BW of 100kHz is used.
FREQSEL
To simplify the TX/RX PLL register setup the FRANGE and SELVCO register are combined to FREQSEL register. The frequency range and FREQSEL[5:0] value table is reproduced below.
| FREQSEL[5:0] | ||
|---|---|---|
| Freuency Range (GHz) | Value | |
| 0.2325 | 0.285625 | 100111 |
| 0.285625 | 0.336875 | 101111 |
| 0.336875 | 0.405 | 110111 |
| 0.405 | 0.465 | 111111 |
| 0.465 | 0.57125 | 100110 |
| 0.57125 | 0.67375 | 101110 |
| 0.67375 | 0.81 | 110110 |
| 0.81 | 0.93 | 111110 |
| 0.93 | 1.1425 | 100101 |
| 1.1425 | 1.3475 | 101101 |
| 1.3475 | 1.62 | 110101 |
| 1.62 | 1.86 | 111101 |
| 1.86 | 2.285 | 100100 |
| 2.285 | 2.695 | 101100 |
| 2.695 | 3.24 | 110100 |
| 3.24 | 3.72 | 111100 |
For example, UMTS Band I centre frequency 2140MHz is in the range 1.86 to 2.285GHz, hence FREQSEL = 100100 (0x24).
Integer and Fractional Part of the Divider
For wanted LO frequency Failed to parse (SVG (MathML can be enabled via browser plugin): Invalid response ("Math extension cannot connect to Restbase.") from server "https://wikimedia.org/api/rest_v1/":): {\displaystyle \mathit{f_{LO}}} and given PLL reference clock frequency Failed to parse (SVG (MathML can be enabled via browser plugin): Invalid response ("Math extension cannot connect to Restbase.") from server "https://wikimedia.org/api/rest_v1/":): {\displaystyle \mathit{f_{REF}}} , calculate calculate integer and fractional part of the divider as below.
First, find temporary variable Failed to parse (SVG (MathML can be enabled via browser plugin): Invalid response ("Math extension cannot connect to Restbase.") from server "https://wikimedia.org/api/rest_v1/":): {\displaystyle x} from the 3 least significant bits of the Failed to parse (SVG (MathML can be enabled via browser plugin): Invalid response ("Math extension cannot connect to Restbase.") from server "https://wikimedia.org/api/rest_v1/":): {\displaystyle \mathit{FREQSEL}} value:
Failed to parse (SVG (MathML can be enabled via browser plugin): Invalid response ("Math extension cannot connect to Restbase.") from server "https://wikimedia.org/api/rest_v1/":): {\displaystyle x = 2 ^ {\mathit{FREQSEL}[2:0] - 3}}
Use Failed to parse (SVG (MathML can be enabled via browser plugin): Invalid response ("Math extension cannot connect to Restbase.") from server "https://wikimedia.org/api/rest_v1/":): {\displaystyle x} to calculate Failed to parse (SVG (MathML can be enabled via browser plugin): Invalid response ("Math extension cannot connect to Restbase.") from server "https://wikimedia.org/api/rest_v1/":): {\displaystyle \mathit{NINT}} and Failed to parse (SVG (MathML can be enabled via browser plugin): Invalid response ("Math extension cannot connect to Restbase.") from server "https://wikimedia.org/api/rest_v1/":): {\displaystyle \mathit{NFRAC}} :
Failed to parse (SVG (MathML can be enabled via browser plugin): Invalid response ("Math extension cannot connect to Restbase.") from server "https://wikimedia.org/api/rest_v1/":): {\displaystyle \mathit{NINT} = \biggl\lfloor {x * \mathit{f_{LO}} \over \mathit{f_{REF}}} \biggr\rfloor}
Failed to parse (SVG (MathML can be enabled via browser plugin): Invalid response ("Math extension cannot connect to Restbase.") from server "https://wikimedia.org/api/rest_v1/":): {\displaystyle \mathit{NFRAC} = \biggl\lfloor 2 ^ {23} \biggl[ {x * \mathit{f_{LO}} \over \mathit{f_{REF}}} - \mathit{NINT} \biggr] \biggr\rfloor}
and store the values in Failed to parse (SVG (MathML can be enabled via browser plugin): Invalid response ("Math extension cannot connect to Restbase.") from server "https://wikimedia.org/api/rest_v1/":): {\displaystyle \mathit{NINT}} /Failed to parse (SVG (MathML can be enabled via browser plugin): Invalid response ("Math extension cannot connect to Restbase.") from server "https://wikimedia.org/api/rest_v1/":): {\displaystyle \mathit{NFRAC}} registers at address 0x10-0x13 for TXPLL and 0x20-0x23 for RX PLL.
For example Failed to parse (SVG (MathML can be enabled via browser plugin): Invalid response ("Math extension cannot connect to Restbase.") from server "https://wikimedia.org/api/rest_v1/":): {\displaystyle \mathit{f_{LO}}} is band 1 centre frequency of 2140MHz, and Failed to parse (SVG (MathML can be enabled via browser plugin): Invalid response ("Math extension cannot connect to Restbase.") from server "https://wikimedia.org/api/rest_v1/":): {\displaystyle \mathit{f_{REF}}} = 30.72MHz:
Failed to parse (SVG (MathML can be enabled via browser plugin): Invalid response ("Math extension cannot connect to Restbase.") from server "https://wikimedia.org/api/rest_v1/":): {\displaystyle \mathit{FREQSEL}[5:0] = 0\mathrm{b}100100, \mathit{FREQSEL}[2:0] = 0\mathrm{b}100 = 0 \mathrm{x} 4 = 4}
Failed to parse (SVG (MathML can be enabled via browser plugin): Invalid response ("Math extension cannot connect to Restbase.") from server "https://wikimedia.org/api/rest_v1/":): {\displaystyle x = 2 ^ {\mathit{FREQSEL}[2:0] - 3} = 2 ^ {4 - 3} = 2 ^ 1 = 2}
Failed to parse (SVG (MathML can be enabled via browser plugin): Invalid response ("Math extension cannot connect to Restbase.") from server "https://wikimedia.org/api/rest_v1/":): {\displaystyle \mathit{NINT} = \biggl\lfloor {x * \mathit{f_{LO}} \over \mathit{f_{REF}}} \biggr\rfloor = \biggl\lfloor {2 * 2140 \over 30.72} \biggr\rfloor = 139}
Failed to parse (SVG (MathML can be enabled via browser plugin): Invalid response ("Math extension cannot connect to Restbase.") from server "https://wikimedia.org/api/rest_v1/":): {\displaystyle \mathit{NFRAC} = \biggl\lfloor 2 ^ {23} \biggl[ {x * \mathit{f_{LO}} \over \mathit{f_{REF}}} - \mathit{NINT} \biggr] \biggr\rfloor = \biggl\lfloor 2 ^ {23} \biggl[ {2 * 2140 \over 30.72} - 139 \biggr] \biggr\rfloor = 2708821}
VCO Capacitor, Icp and Ioff Selection
For the PLL loop filter implemented on the evaluation board, loop bandwidth of 100kHz and optimum PLL phase noise performance, the following charge pump current setup is recommended.
- Charge pump current Icp=1200uA (default).
- Charge pump current offset up Ioff up = 30uA.
- Charge pump current offset down Ioff down = 0uA (default).
Regarding VCOCAP selection, a flexible algorithm based on monitoring on chip Vtune comparators state is developed as described below.
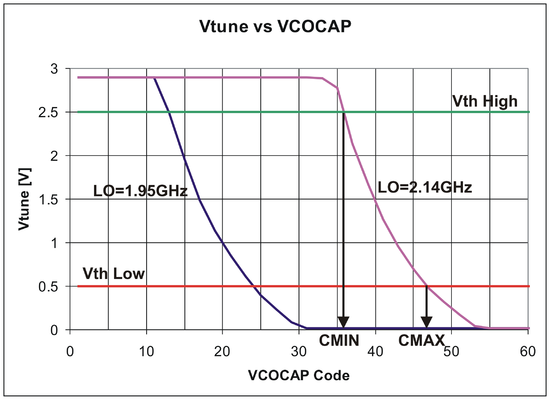
Typical measured Vtune variation with the VCOCAP codes for the two target LO frequencies, 1.95GHz and 2.14GHz. Obviously, Vtune is changing from 2.9V down to 0V. However, PLL lock is guaranteed only when Vtune is in the range 0.5V-2.5V. Also, for the best phase noise performance, Vtune should be kept around the middle of the range i.e. 1.5V.
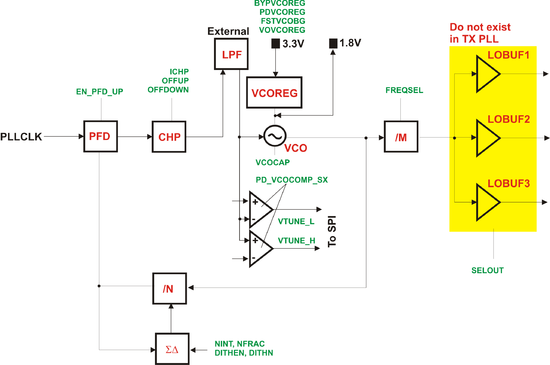
There are two on chip Vtune comparators per PLL as shown in PLL Control. Their threshold voltages are set to Vth Low=0.5V and Vth High=2.5V. The state of the comparators can be obtained by powering them up (register 0x1B for TXPLL or 0x2B for RXPLL, bit 3) and reading the register 0x1A for TXPPLL or 0x2A for RXPLL, bits 7-6. True table is given below.
| VTUNE H | VTUNE L | Status |
|---|---|---|
| 0 | 0 | OK, Vtune in range. |
| 1 | 0 | Vtune is high (> 2.5V), PLL lock not guaranteed. |
| 0 | 1 | Vtune is Low (< 0.5V), PLL lock not guaranteed. |
| 1 | 1 | Not possible, check SPI connections. |
These can be used to choose VCOCAP code. All we need to find is the code CMIN when comparators change the state from “10” to “00” and the code CMAX when the comparators change the state from “00” to “01”. Optimum VCOCAP code is then the middle one between CMIN and CMAX. For LO=2.4GHz, this is illustrated in VCO Capacitor, Icp and Ioff Selection. In this case, optimum code is around 41.
The algorithm is summarised as below.
- Select correct FREQSEL.
- Set target LO frequency (NINT, NFRAC) as explained in Integer and Fractional Part of the Divider
- Sweep VCOCAP codes from 0-63. Monitor the state of Vtune comparators.
- Record the code CMIN when Vtune comparators state changes from "10" to "00" (PLL enters 'in range' state).
- Record the code CMAX when Vtune comparators state changes from "00" to "01" (PLL leaves 'in range' state).
- Select the middle code between CMIN and CMAX ( C=(CMIN+CMAX)/2 ).
Note that faster search algorithm (replacement for step 3 above) can be implemented as shown in VCO and VCOCAP Code Selection Algorithm.
Once the PLL is set, Vtune comparators can also be used as lock (in range) indication.
PLL Control
TX/RF LPF
TX RF
RXVGA2
RX FE
Calibration Flow Charts
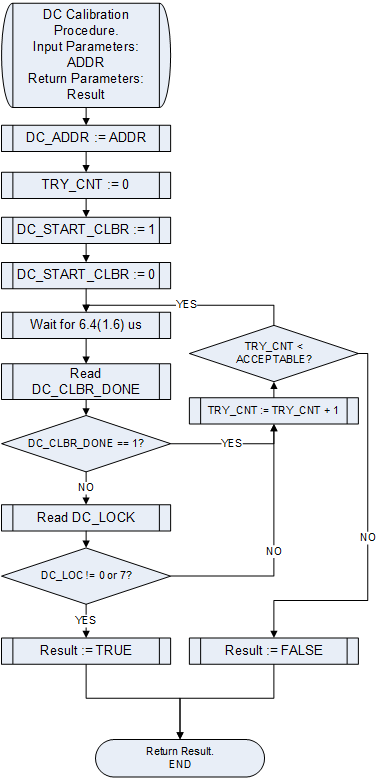
General DC Calibration Procedure
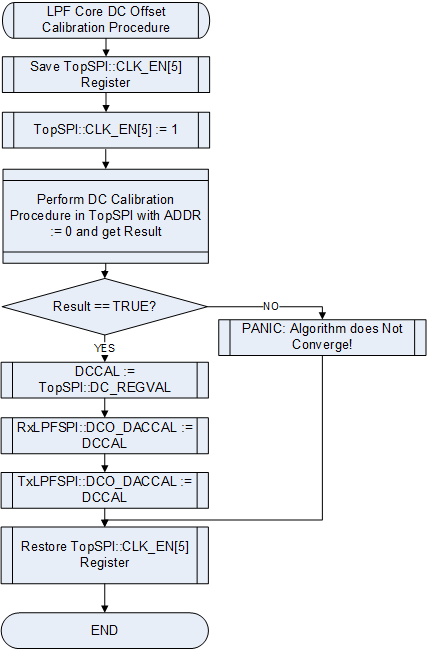
DC Offset Calibration of LPF Tuning Module
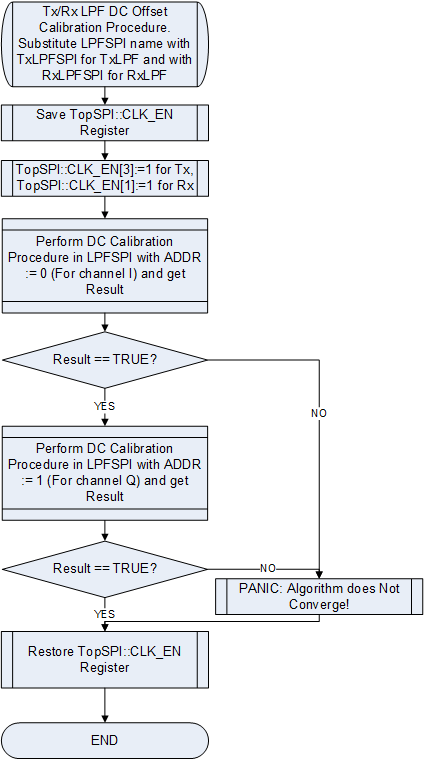
TX/RX LPF DC Offset Calibration
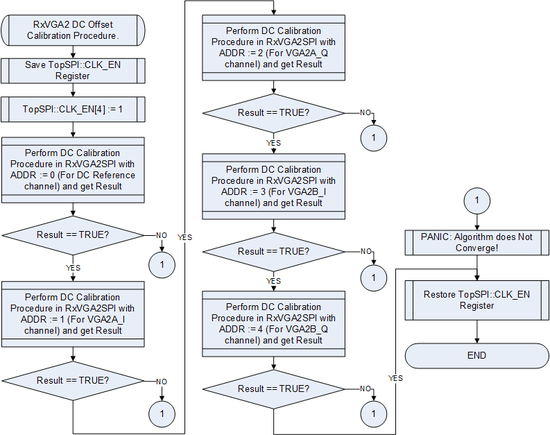
RXVGA2 DC Offset Calibration
LPF Bandwidth Tuning
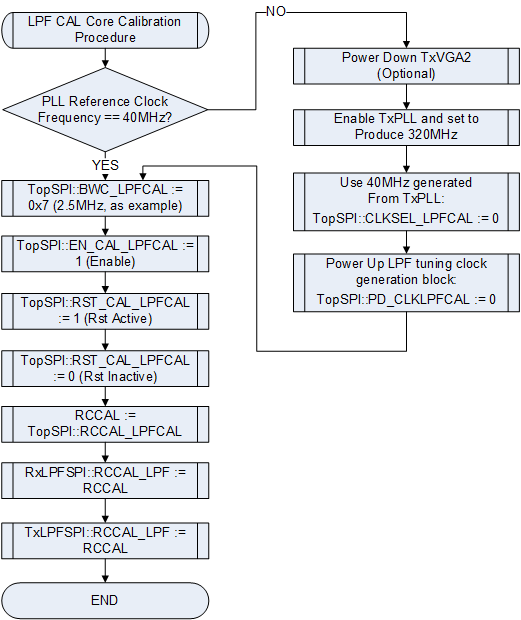
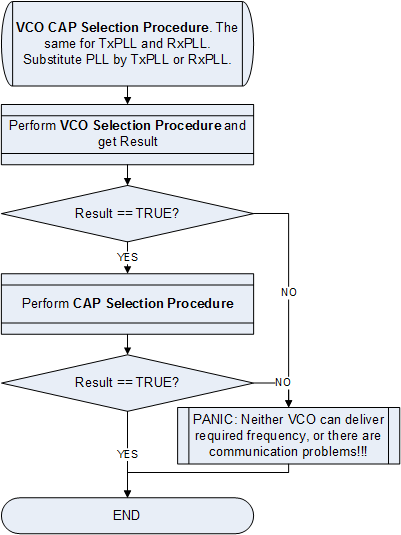
VCO and VCOCAP Code Selection Algorithm
General Procedure
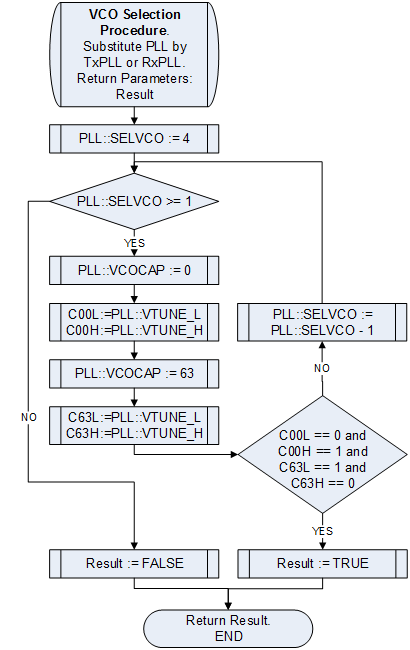
VCO Selection
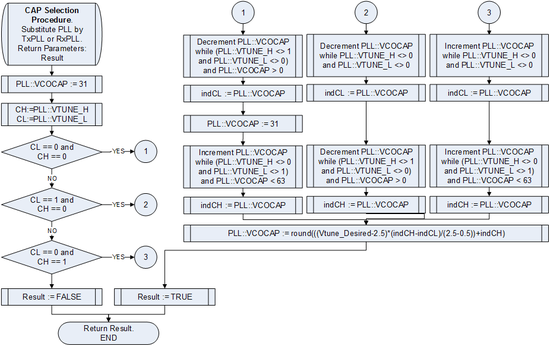
VCOCAP Selection
Auto Calibration Summary
The following is recommended auto calibration sequence.
- DC offset cancellation of the LPF tuning module.
- LPF bandwidth tuning.
- DC offset cancellation of the TXLPF.
- DC offset cancellation of the RXLPF.
- DC offset cancellation of the RXVGA2.
Please note, while executing DC calibration procedures no TX/RX inputs should be applied.
LMS6002D has on-chip DACs for TX LO leakage calibration. Those DACs have been designed to provide around -50/-60dBc LO leakage cancellation.
Correction and Measurement Functions Implemented in BB
Applying IQ Gain Offset to Baseband Signals
Software in baseband initially applies course gain variation on the I or Q channel and measures the loopbacked signal via the LMS6002D receiver to measure the optimum value. The example block for gain correction is shown below.
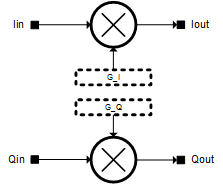
This block implements the following equation:
Failed to parse (SVG (MathML can be enabled via browser plugin): Invalid response ("Math extension cannot connect to Restbase.") from server "https://wikimedia.org/api/rest_v1/":): {\displaystyle \begin{align} \mathit{Iout} = \mathit{Iin} * \mathit{G\_I} \\ \mathit{Qout} = \mathit{Qin} * \mathit{G\_Q} \end{align} }
Failed to parse (SVG (MathML can be enabled via browser plugin): Invalid response ("Math extension cannot connect to Restbase.") from server "https://wikimedia.org/api/rest_v1/":): {\displaystyle \mathit{G\_I}} and Failed to parse (SVG (MathML can be enabled via browser plugin): Invalid response ("Math extension cannot connect to Restbase.") from server "https://wikimedia.org/api/rest_v1/":): {\displaystyle \mathit{G\_Q}} are programmable correction factors which are altered by the BB modem to minimise unwanted side band component.
Applying IQ Phase Band Offset Baseband Signals
The baseband S/W applies a course phase multiplier on the I or Q channel and measures the loopbacked signal via the LMS6002D receiver to measure the optimum value. The process is then repeated using a finer control step to ascertain the optimum phase and gain offset value to be applied. The example block for gain correction shown below.
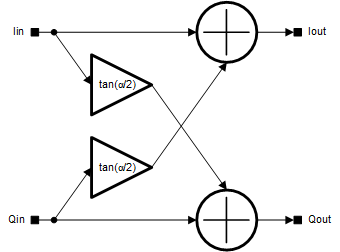
IQ phase correction is in fact equivalent to vector rotation. If quadrature phase error is Failed to parse (SVG (MathML can be enabled via browser plugin): Invalid response ("Math extension cannot connect to Restbase.") from server "https://wikimedia.org/api/rest_v1/":): {\displaystyle \alpha} , then I and Q vectors are both rotated by Failed to parse (SVG (MathML can be enabled via browser plugin): Invalid response ("Math extension cannot connect to Restbase.") from server "https://wikimedia.org/api/rest_v1/":): {\displaystyle \alpha/2} but in opposite directions hence IQ outputs of the corrector are 90° phase shifted. IQ phase correction equations are given below:
Failed to parse (SVG (MathML can be enabled via browser plugin): Invalid response ("Math extension cannot connect to Restbase.") from server "https://wikimedia.org/api/rest_v1/":): {\displaystyle \begin{align} \mathit{Iout} = \mathit{Iin} + \mathit{Qin} * \tan \biggl( {\alpha \over 2} \biggr) \\ \mathit{Qout} = \mathit{Qin} + \mathit{Iin} * \tan \biggl( {\alpha \over 2} \biggr) \end{align} }
The value of Failed to parse (SVG (MathML can be enabled via browser plugin): Invalid response ("Math extension cannot connect to Restbase.") from server "https://wikimedia.org/api/rest_v1/":): {\displaystyle \tan(\alpha/2)} is used as a programmable correction parameter. BB modem should alter this value to minimise unwanted side band component.
Correcting RX I and Q DC Levels
Software in the receiver baseband is required to calibrate the DC level on the I and Q channel received. The process of applying DC level adjustment to the I & Q channel is an optional requirement required for fine tuning purposes only. The methodology of correcting the DC levels is shown in the diagram below.
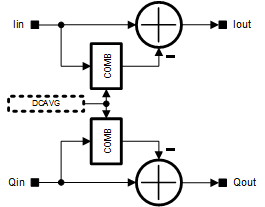
The averaging (COMB) filter calculates the DC of the corrector input and that DC is subtracted to cancel it. The loop is running all the time so any change of the RX DC due to the signal level change, RX gain change or temperature will be tracked and cancelled automatically. The loop only programmable parameter is DCAVG which defines averaging window size.
Document Version
Based on LMS6002DR2 Programming and Calibration Guide 1_1R5, Version 1 Revision 4.
Changes since document generation:
- Updated General DC Calibration Procedure diagram.
- Minor formatting changes and corrections.
| |||||||||||||||||||||||||
