LimeNET-Micro SO-DIMM Adapter for Classic Raspberry Pi
Introduction
LimeNET-Micro SO-DIMM adapter v1.2 board can be used to connect “classic” Raspberry Pi to LimeNET-Micro v2.1 instead of CM3 (Compute module 3).
Complete Adapter Kit Package
The LimeNET-Micro complete adapter kit showed Figure 1.
TBD
Adapter kit content:
- LimeNET-Micro SO-DIMM adapter
- Flat ribbon cable with 2 female plugs.
LimeNET-Micro SO-DIMM adapter board Key Features
LimeNET-Micro SO-DIMM adapter is a small SO-DIMM form factor board plus ribbon cable to enable use of a classic/consumer Raspberry Pi with the LimeNET Micro boards.
For more information on the following topics, refer to the respective documents:
LimeNET-Micro SO-DIMM adapter board features:
- Connections
- DDR2 SODIMM connector
- 20x2 Raspberry Pi Header
- Raspberry Pi 5V power jumper
- Raspberry Pi 5V power header
- Raspberry Pi 3.3V power header
- Raspberry Pi USB2.0 header
- Board Size without connectors 67.6mm x 31mm (2.441” x 1.181”)
LimeNET-Micro SO-DIMM adapter board overview
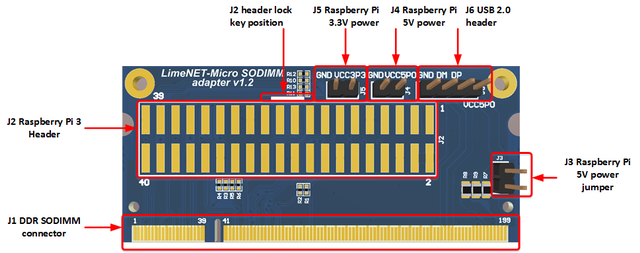
LimeNET-Micro SO-DIMM adapter board version v1.2 picture with highlighted major components and connections presented in Figure 2.

Board components description listed in the Table 2.
| Board Reference | Type (IC5) | Description |
|---|---|---|
| J1 | Connector | DDR2 SODIMM connector |
| J2 | Header | 20x2 Raspberry Pi Header |
| J3 | Jumper | Raspberry Pi 5V power jumper |
| J4 | Header | Raspberry Pi 5V power header |
| J5 | Header | Raspberry Pi 3.3V power header |
| J6 | Header | Raspberry Pi USB2.0 header |
Getting Started with LimeNET-Micro and LimeNET-Micro SO-DIMM adapter
Basic setup
To get LimeNET-Micro board up and running with SO-DIMM adapter:
- Make sure that LimeNET-Micro and Raspberry Pi boards are powered off.
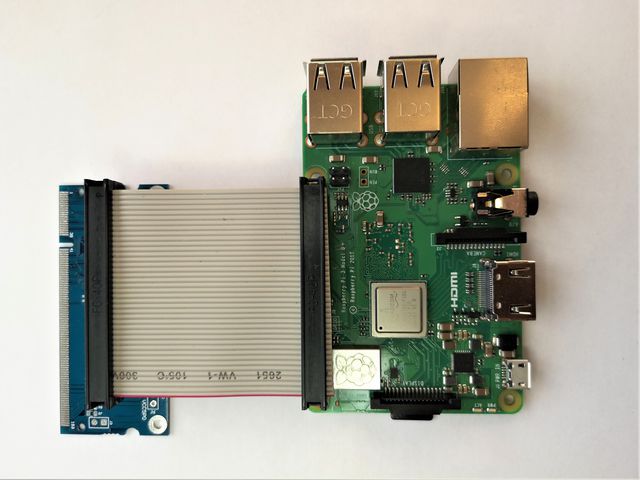
- Connect female plug of one end of ribbon cable to Raspberry Pi, make sure to match first pin positions (see Figure 3), lock key should be facing towards Raspberry Pi board;
- Connect female plug of other end of ribbon cable to LimeNET-Micro SO-DIMM adapter, make sure to match lock pin position (See Figure 2);
- Install LimeNET-Micro SO-DIMM adapter into LimeNET-Micro SO-DIMM socket;
- Power up Raspberry Pi (follow instructions on https://www.raspberrypi.org) and power up LimeNET-Micro board (follow instructions on https://wiki.myriadrf.org/Getting_Started_with_the_LimeNET-Micro)


Data transfer options
Data from/to LimeNET-Micro board can be transferred in two ways – through Raspberry Pi SPI interface (Option Nr.1) or USB2.0 (Option Nr.2). Each option requires specific gateware to be programmed for LimeNET-Micro board.
- Option Nr. 1 – in this case when LimeNET-Micro SO-DIMM adapter is connected no additional cables are needed and data can be transferred trough Raspberry Pi SPI interface.
- Option Nr. 2 – in this case for LimeNET-Micro v2.1 board jumper J14 has to be removed and J18 has to be installed and one end of microUSB cable has to be connected to J15 connector. For additional info see chapter 3.3 USB subsystem of LimeNET-Micro v2.1 hardware description. Connect other end of microUSB cable to one of the Raspberry Pi USB2.0 ports.
Board Design Files
Here are links to the schematic, PCB project and BOM:
TBD